![]() People compress or "zip" electronic files for different reasons – to make them easier to transport electronically, to organize their backups, or to save device storage space, for example.
People compress or "zip" electronic files for different reasons – to make them easier to transport electronically, to organize their backups, or to save device storage space, for example.
Whatever your use case, the good news is that there's no need to download additional software to compress files in macOS. That's because Apple includes a built-in ability to zip files on your Mac, allowing you to quickly compress single files, groups of files, or entire folders. Keep reading to learn how.
How to Zip a File or Folder on Mac
- Click the Finder icon in your Mac's Dock to make sure it's the active application.
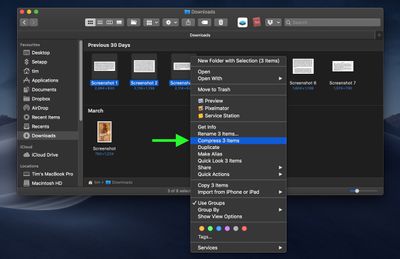
- Right-click (or Control-click) on the file or folder you want to compress. Alternately, drag a selection box over several files and/or folders with your cursor by holding down the left mouse button or pressing down on the trackpad.
- Select Compress [name of file] or Compress X Items from the contextual dropdown menu.

- Locate the newly created zip file in the same directory as the original files and/or folders.
If you compressed a single file, the zip archive takes the same name and adds a zip extension. If you compressed more than one file or folder, the zip archive will be named "Archive.zip" by default.
How to Decompress a Zip Archive on Mac
![]()
Unzipping a compressed archive is as easy as double-clicking on the zip file. The files and/or folders will be extracted to the same location as the archive.


