In iOS 12, Apple has given users the tools to cut down on disturbances to get more time away from their devices if desired, and one of these new tools is an expanded set of Do Not Disturb options.
Thanks to these changes, there are more convenient options for using Do Not Disturb in iOS 12, and it's also a lot smarter.
How to Get to the New Do Not Disturb Options
Your Do Not Disturb options in the Settings app are largely the same, with the new Do Not Disturb features housed in Control Center.
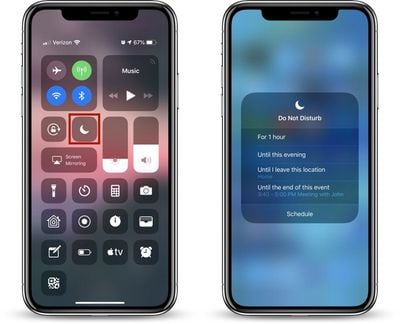
- Open Control Center, through a right-side swipe downwards on the screen of an iPhone X or iPad or by swiping upwards from the Home button on other devices.
- 3D Touch or long press on the Control Center icon that looks like a moon, which is the icon for Do Not Disturb.
- A 3D Touch or a long press brings up all of the Do Not Disturb options, which can be selected with a tap.
Do Not Disturb is a default widget within the Control Center and it's always available, so it's not an option that needs to be enabled through the Control Center customization options.
All of the Ways You Can Use Do Not Disturb in iOS 12
There are multiple new limited-time settings for Do Not Disturb in the Control Center, which automatically turn off after the specified time elapses.
- For one hour
- Until this evening (or afternoon/morning depending on the time - it's generally a few hours)
- Until I leave this location
- Until this event ends (if you have a timed event set in your calendar)
- A single tap on the icon without selecting an option turns on Do Not Disturb until you tap it again.
Not all of these options will be visible at all times. If you're not in a set location or you don't have any events scheduled, these two options won't appear. The first two, allowing you to set Do Not Disturb for an hour or until the evening/afternoon/morning are always available.
Underneath these options, there's a "Schedule" button (see screenshot at top) that will open up the Settings app so you can set a specific time period for when you want Do Not Disturb to turn on. This is also where you can turn on Do Not Disturb at Bedtime, a feature that prevents notifications from displaying on the iPhone's display at night.
Check out our Do Not Disturb at Bedtime how to for more details on this feature.
Managing Do Not Disturb Settings
Your general Do Not Disturb settings are available in the Settings app, which can be accessed by going to Settings > Do Not Disturb or through the above mentioned "Schedule" section of the No Not Disturb Control Center widget.
Most of these settings aren't new, but we thought it would be useful to offer a quick primer on Do Not Disturb's other settings alongside what's new in iOS 12.
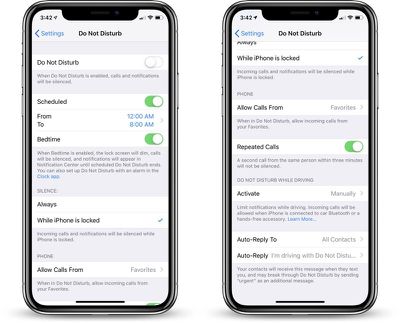
In the Settings app, you can enable or disable Do Not Disturb, set a specific time for Do Not Disturb to turn on and off, or enable Bedtime Mode.
You can also choose whether Do Not Disturb should mute calls and notifications only while the iPhone is locked or at all times, and there are options to select whether calls from certain people should bypass your Do Not Disturb settings. This section is also where you'll find your Do Not Disturb While Driving options.












Top Rated Comments
I work 5pm - 3am Tuesday through Friday, (so I schedule DND for 3am - 11am), but Saturday, Sunday, and Monday, I sleep normal people’s hours (during the night), so my scheduled DND does not apply, and I have to remember to turn the schedule off.
Why can’t Apple implement this in iOS? Isn’t it a basic function that is required for anyone using the iPhone in a business environment? That and being able to see the status of the “mute” during the call so that if you have to step into a noisy environment, you can make sure that your iPhone is muted with a single glance at the lock screen.
Why is it taking Apple over a decade to implement these two basic features?