Nearly everything on the internet begins with a Domain Name System (DNS) request. When you click a link on a website or send an email, the first thing your device does is consult a DNS to find out which server it should connect to. The DNS does the job of linking a numerical IP address (192.168.1.1, for example) to its more easily identifiable domain name, like macrumors.com. In this way, a DNS is a lot like an internet directory service.

Unfortunately, the DNS resolvers assigned by ISPs can often be sluggish and aren't always very secure. For example, your ISP and anyone else listening in on the internet can see every site you visit if the DNS doesn't use strong encryption. That's why it makes good sense to specify what DNS directory your devices use whenever a request is made.
Cloudflare offers a consumer DNS resolver called 1.1.1.1 that promises faster speeds while also being centered around privacy. 1.1.1.1 is a partnership between Cloudflare and APNIC, a non-profit organization managing IP address allocation for the Asia Pacific and Oceania regions.
The power of the Cloudflare network gives 1.1.1.1 an advantage in terms of delivering speedy DNS queries. Since it has been deployed on Cloudflare's 1000+ servers worldwide, users across the globe can get a quick response from 1.1.1.1, which should make their internet use feel snappier overall. In addition, these servers have access to the over 20 million+ internet properties on the Cloudflare platform, making queries for those domains extremely fast.
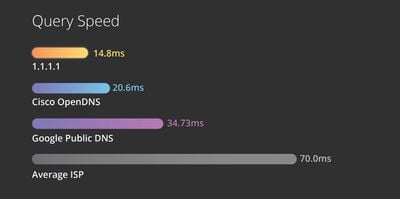
1.1.1.1 also offers some security features not available from many other public DNS services, such as query name minimization. Query name minimization diminishes privacy leakage by only sending minimal query names to authoritative DNS servers. The best thing about 1.1.1.1 though is that it's free to use. Simply follow the steps below to start using it on your particular device.
How to Set Up 1.1.1.1 on Mac
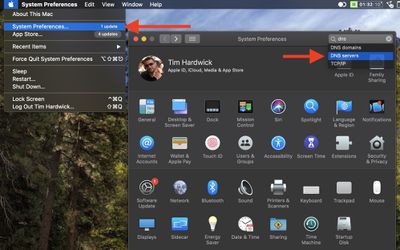
- Launch System Preferences from your Mac's Dock, from the Applications folder, or from the Apple menu bar ( -> System Preferences…).
- Type DNS Server into the search field at the top, then select it from the dropdown.

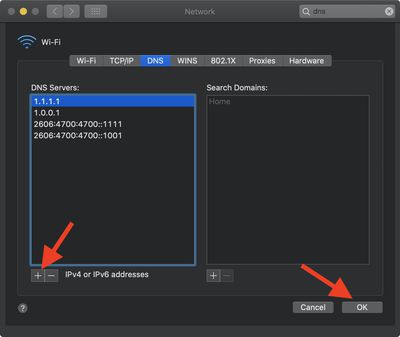
- Click the plus (+) button to add a DNS Server and enter 1.1.1.1
- Click + again and enter 1.0.0.1 (this is for redundancy).
- Click + again and enter 2606:4700:4700::1111 (this is for redundancy).
- Click + again and enter 2606:4700:4700::1001 (this is for redundancy).
- Click OK.

- Click Apply.
When you apply the changes your internet connection may temporarily disconnect and reconnect again. If you want, you can restart your Mac to ensure the changes take effect across the board.
How to Set Up 1.1.1.1 on iOS
Cloudflare has developed a mobile app that does everything you need to take advantage of 1.1.1.1 on your iPhone or iPad. Simply download it from the App Store [Direct Link] and follow the app's on-screen prompts for a faster, more secure internet.
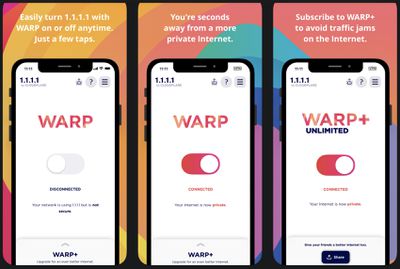
Note that 1.1.1.1 with WARP is free within the app, but WARP+ is a paid feature which can be enabled at any time. WARP+ offers the same features as the free version, but also routes internet requests through Cloudflare's network using a feature called Argo Smart Routing, which ensures that connections aren't affected by network congestion. More information is available in the app.


