With iOS 16 and watchOS 9, Apple built out its sleep features with additional sleep tracking data and insights. Keep reading to learn how to set up sleep tracking for Apple Watch.
![]()
Apple enhanced the built-in Sleep app on the Apple Watch in a big way in watchOS 9, introducing Sleep Stages. With Sleep Stages, the Apple Watch is able to tell you how much time you spent in REM, Core, or Deep sleep during the night, along with the amount of time that you were awake.
You can also compare this data with the heart rate, respiratory rate, and (on Apple Watch 8 and Apple Watch Ultra models) wrist temperature measurements that your Apple Watch can take throughout the night.
To begin tracking your sleep with Apple Watch, you need to set up a sleep schedule on your iPhone or Apple Watch. The following steps show you how it's done.
How to Set a Sleep Schedule on iPhone
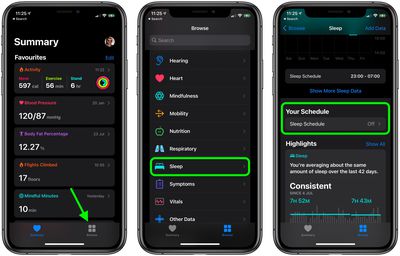
- Launch Apple's Health app on your iPhone.
- Tap the Browse tab in the bottom-right corner of the screen.
- Scroll down and select Sleep.
- Tap Sleep Schedule under "Your Schedule".

- If Sleep Schedule is off, tap the switch to toggle it to the green ON position.
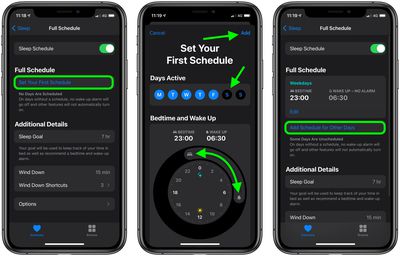
- Under "Full Schedule," tap Set Your First Schedule.
- Tap any of the blue circles under "Days Active" to disable Sleep Schedule on any days of the week.
- Using your finger, drag the ends of the sleep block to extend it around the clock graphic. This sets your sleep goal as well as your bedtime and wakeup time.
- Scroll down to reveal your Alarm options. Use the switch next to Wake Up Alarm to turn the alarm on/off. If you enabled the alarm, you can select the vibration type and sound you'd like to hear using Sounds & Haptics, adjust the volume using the slider, and allow for a snooze using the Snooze switch.
- Tap Add in the top-right corner when you're done.
- To add a different schedule for different days (the weekend, for example), tap Add Schedule for Other Days and customize your options as described in the previous steps.

Note that if this is your first time setting up a Sleep Schedule, after opening the Health app and navigating to the Sleep section, you'll need to tap on "Get Started" and set a sleep goal before you can set and adjust your sleep schedule.
How to Set a Sleep Schedule on Apple Watch
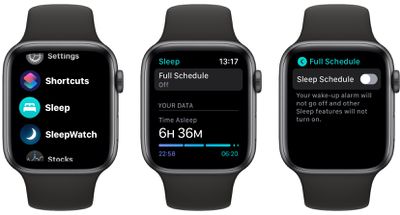
- Press the Digital Crown on your Apple Watch to open the App View.
- Launch the Sleep app.
- Tap Full Schedule.
- Tap the switch next to Sleep Schedule to toggle it to the green ON position.

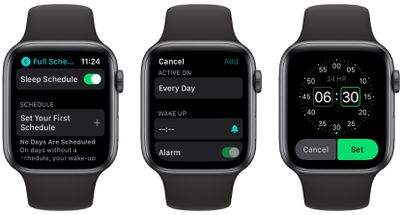
- Now tap Set Your First Schedule.
- If you only want this schedule to apply on certain days of the week, tap Every Day, then uncheck the days to exclude. Otherwise, tap the button below Wake Up, rotate the Digital Crown to select a wakeup time, then tap Set.

- Use the switch next to Alarm to turn the alarm on/off. If you enabled the alarm, you can select the vibration type and sound you'd like to hear using the Sounds & Haptics button. Note that if your watch is in silent mode, your alarm will be replaced by a tap on the wrist.
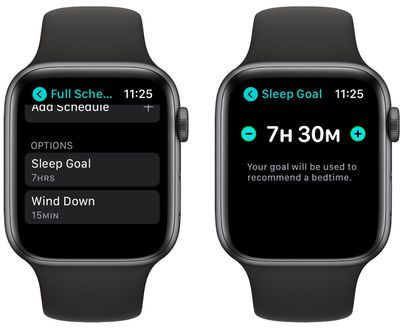
- Your suggested bedtime is based on your Sleep Goal, which you can edit by using the back button to return to the Full Schedule menu screen. From there, swipe down and tap Sleep Goal, and adjust the hours and minutes to suit.

How to View Sleep Tracking Data
The Health app includes sleep comparison charts that show heart rate and respiratory rate so you can see how you're doing through the night. Here's how to find them on your iPhone.
- Open the Health App.
- Tap the Browse tab, then select Sleep.
- Scroll down to see sleep tracking highlights, or view the full depth of insight data, including Stages, Amounts, and Comparisons, by tapping Show More Sleep Data below the sleep chart.

You can also view this data on your wrist by opening the Sleep app on your Apple Watch.
Related Forum: Apple Watch


