![]() In iOS 13, Apple fleshed out the feature set of the stock Notes app while enhancing the viewing and search functions in such a way that it's now easier than ever to generate, find, and organize your notes.
In iOS 13, Apple fleshed out the feature set of the stock Notes app while enhancing the viewing and search functions in such a way that it's now easier than ever to generate, find, and organize your notes.
In particular, there are new options to share entire folders of notes with friends or colleagues, including the ability to share your notes in a read-only capacity. Keep reading to learn how it's done.
In iOS 12, users were limited to sharing individual notes in Apple's stock app, which was frustrating for heavy note-takers, to say the least. Fortunately, there are two ways you can share a folder of notes in iOS 13.
Method 1
- Launch the Notes app on your iPhone or iPad.
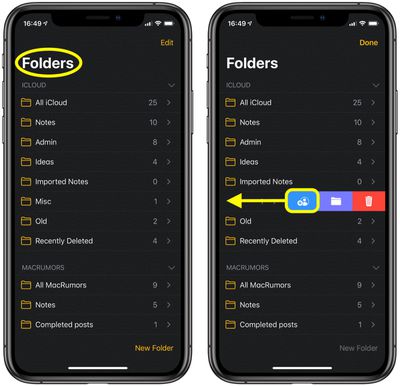
- In the Folders view, swipe from right to left on the folder that you want to share.

- Tap the leftmost Share button (the blue icon).
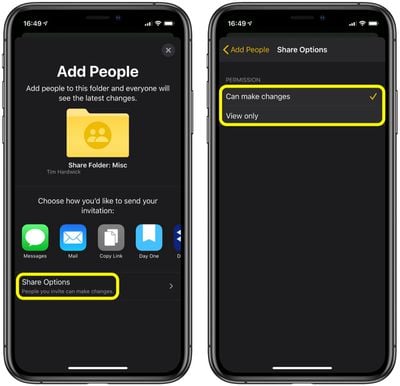
- Check that the Share Options permissions at the bottom of the screen are set the way you want (invited people either Can make changes or View only).

- Choose how you'd like to share the folder. The default sharing options include iMessage, Mail, and a Copy Link option if you want to share the invitation link in another way that's not offered in the additional third-party sharing buttons shown.
Method 2
- Launch the Notes app on your iPhone or iPad.
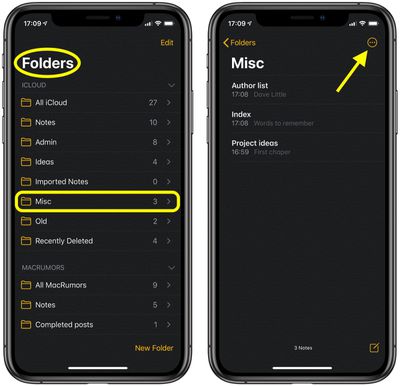
- Tap into the folder of notes that you want to share.

- Tap the circled ellipsis button at the top right corner of the screen.
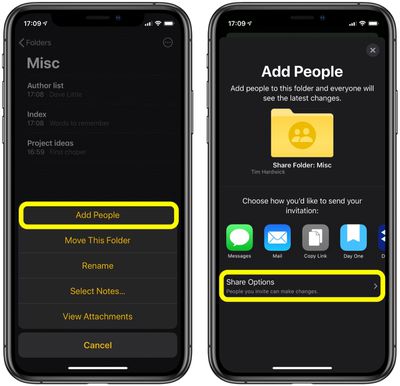
- Select Add People in the pop-up menu.
- Check that the Share Options permissions at the bottom of the screen are set the way you want (invited people either Can make changes or View only).

- Choose how you'd like to share the folder. The default sharing options include iMessage, Mail, and a Copy Link option if you want to share the invitation link in another way that's not offered in the additional third-party sharing buttons shown.
If you use a Mac running macOS Catalina and signed into the same iCloud account, the sharing status of your folders and your chosen permissions will be automatically synced to the desktop Apple Notes app.


