![]() Apple's FaceTime app lets you make video or audio calls from your iPad to any of your friends and family, as long as they have an iPhone, iPad, iPod touch or Mac.
Apple's FaceTime app lets you make video or audio calls from your iPad to any of your friends and family, as long as they have an iPhone, iPad, iPod touch or Mac.
Using your iPad's front-facing camera and FaceTime, you can talk face to face, or switch to the rear camera so that both you and the person you're on a call to can see what's in front of you.
Setting up FaceTime on iPad is easy – just make sure you're connected to Wi-Fi or cellular data, then follow the steps below. Note that if you also have an iPhone nearby and connected to Wi-Fi, you can choose to register your phone number for people to reach you over FaceTime, and those calls will be received by your iPad too. Here's how it works.
- Launch the Settings app on your iPad.
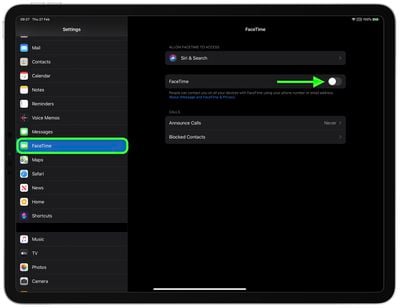
- Scroll down and tap FaceTime.
- Enter your Apple ID if it's not already entered for you, then tap Enter.
- If you're already signed in with your Apple ID, tap the switch next to FaceTime so it's in the green ON position.

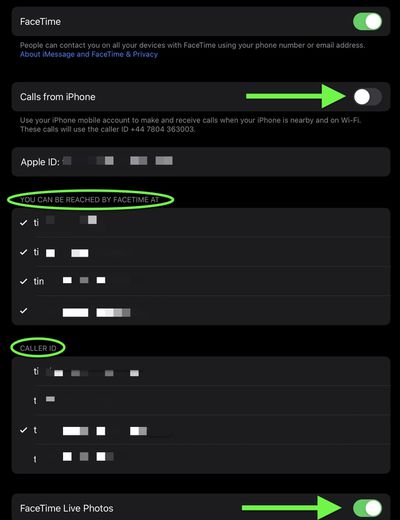
- Turn on the switch next to Calls from iPhone if you want to use your iPhone's cellular number to make and receive calls when it's nearby and connected to the same Wi-Fi network as your iPad.
- Under the section titled You Can Be Reached By FaceTime At, select the email address(es) that you want people to be able to use to reach you via FaceTime.
- Under the section titled Caller ID, select the email address that you want to use as your Caller ID.

- If you want to let people be able to take Live Photos during FaceTime calls, turn on the switch next to FaceTime Live Photos.
Note that you can also block people from contacting you over FaceTime (or phone calls, messages, and email) by tapping the Blocked Contacts option at the bottom of the screen and then adding the contacts that you want to block.
Now that you're set up, friends and family will be able to get in touch with you to via FaceTime, and of course you can fire up the FaceTime app at any time to call them yourself.


