![]() Gmail for iPhone and iPad now offers users the ability to schedule emails to be sent at a later time and date. If you don't need to send an email right now, but don't want to forget to send it later, it's a useful trick to have in your mail app.
Gmail for iPhone and iPad now offers users the ability to schedule emails to be sent at a later time and date. If you don't need to send an email right now, but don't want to forget to send it later, it's a useful trick to have in your mail app.
Scheduled emails are also handy if you want time to reflect on what you've written before it's sent, or when you're emailing someone in a different time zone and you don't want it to be pinging their inbox at an ungodly hour.
The steps below explain how to schedule sending a message in Gmail for iOS:
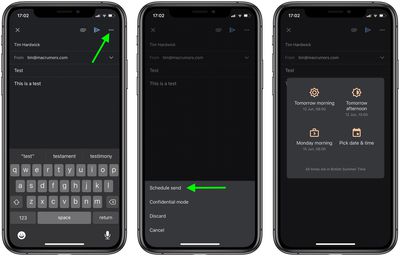
- Launch Gmail on your iPhone or iPad and compose a message using the big plus button at the bottom of the screen.
- Tap the three dots in the top-right corner of the screen.

- Tap Schedule Send from the options at the bottom of the screen.
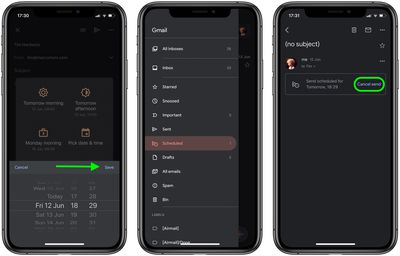
- Choose a time suggested by Gmail, or tap Pick date & time to select your own date and time for the email to be sent, then tap Save in the top-right corner of the overlay.

- The email will now appear in your Scheduled box. To edit it, you'll have to open the message and tap Cancel send, which will move it to your Drafts box.

You can also schedule emails in Gmail using your browser. Simply click the arrow next to the Send button and select Schedule Send to access the same options described above.


