The video recording capabilities of iPhones and iPads get better with each new model that Apple releases, which is great if you want to capture the best-looking video possible. However, the higher quality the video format is, the more storage space the video files naturally take up, which may not be good news if you're device is short on capacity.

Typically, iPhones default to shooting video in 1080p HD at 30 frames per second. Using these settings, a minute of video takes up 65MB of your storage. If that sounds a lot and you don't have much storage to play with, you can customize the resolution and frame rate of recorded video to reduce the file size.
The following steps show you how it's done.
- Launch the Settings app on your iOS device.
- Scroll down and tap Camera.
- Tap Record Video.
- Select a resolution and frame rate to record video at. Note that shooting the 4K options take the most space. If you want to significantly reduce video file size, choose between 720p and 1080p HD at 30 fps.

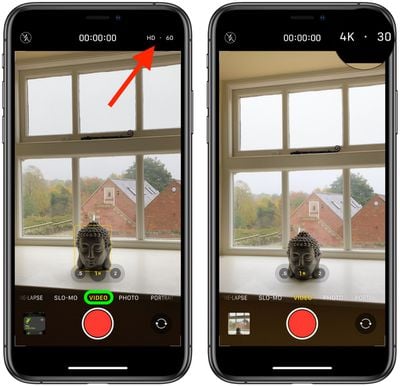
If you have an iPhone 11 or later model, you can change the video resolution and frame rate on the fly from within the Camera pp.
Next time you shoot video using the Video mode found in the menu strip below the viewfinder, notice the video resolution and frame rate separated by a dot in the top-corner of the screen.
If video quality is set to 1080p in Settings -> Camera, you can tap the resolution in the Camera interface to flip between HD (1080p) and 4K. If it's set to 720p in Settings, tapping the format flips between 720p and 4K. You can also tap the frame rate to select your desired option.

For example, when shooting in 4K, you can tap the frame rate to switch between 24, 30, 60, and 120fps. If you shoot in HD (1080p) format, you can flip between 30 and 60fps, and when shooting in 720p, the frame rate is limited to 30fps.


