![]() In Apple's Safari web browser, there are several ways to make viewing web pages easier on the eyes. All of them involve adjusting the font size or the zoom level that Safari applies when it loads web page content, which can be helpful if you're using a small screen or a large display set at a high resolution.
In Apple's Safari web browser, there are several ways to make viewing web pages easier on the eyes. All of them involve adjusting the font size or the zoom level that Safari applies when it loads web page content, which can be helpful if you're using a small screen or a large display set at a high resolution.
To increase or decrease the zoom level of both text and images when viewing web pages in Safari, press Command and the + (plus) or - (minus) keys. You can also click on View in Safari's menu bar and select Zoom In or Zoom Out.
Alternatively, you can add zoom buttons to Safari's interface: Right-click (or Ctrl-click) on a space in the Safari toolbar and click Customize Toolbar.... Then drag the Zoom buttons in the dropdown to the space you just clicked on the toolbar. Click Done to finish.
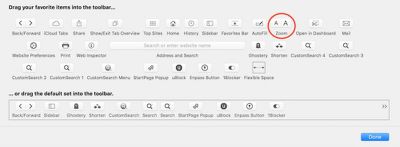
If you want to keep images at the same size and only adjust web page font size on the fly, press Option-Command and the + or - keys. You can also hold down the Option key and click on View in the Safari menu bar, which changes the Zoom options to Make Text Bigger and Make Text Smaller.
Safari will remember your zoom and font size settings until you clear your History. To do so, click Safari in the menu bar, select Clear History..., then click the Clear History button.
Set the Zoom Level for a Specific Website
Once the zoom level is set up for a particular site, Safari applies it automatically whenever you visit it. Here's how it's done.
- Navigate to the site that you want to adjust the zoom level for.
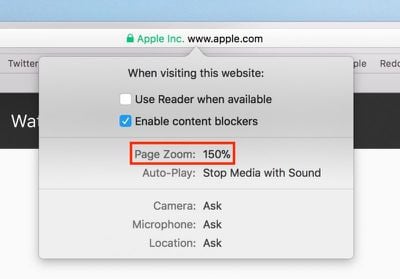
- Right-click on the URL or website name that appears in the address bar, and select Settings for This Website. Alternatively, click Safari in the menu bar and you'll see the same option just below Preferences.
- Click the Zoom Level percentage and select a new level from the dropdown menu. (Anything greater than 100 zooms in; anything less than 100 zooms out.)

Set the Zoom Level for All Web Pages
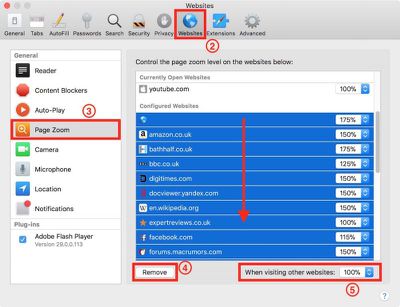
- In Safari's menu bar, select Safari -> Preferences....
- Click the Websites tab.
- Click Page Zoom in the General column.
- Clear any Configured Websites in the list by highlighting them all with your mouse button and then selecting Remove.
- Click the When visiting other websites pop-up menu and choose a percentage to suit.

Set Your Own Zoom Level With a Style Sheet
If none of Safari's zoom level increments sit right with your eyes, here's a way to set your own percentage.
- Open the TextEdit application.
- Click New Document.
- In TextEdit's menu bar, select Format -> Make Plain Text.
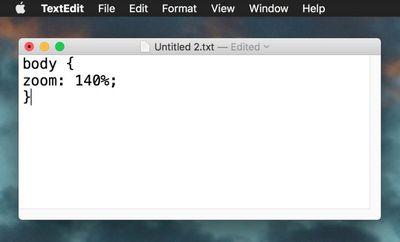
- Copy and paste the following CSS code into the file, changing the zoom number to your preferred percentage level:
body {
zoom: 140%;
}
- In TextEdit's menu bar, select File -> Save....
- Name the file safari zoom.css or whatever you like, just make sure it retains a .css suffix.
- Choose a location for the file and click Save.
- Back in Safari, select Safari -> Preferences... in the menu bar.
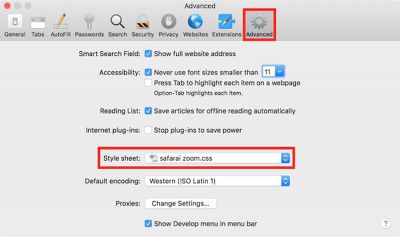
- Select the Advanced tab.
- Click the Style sheet dropdown menu and select Other....
- Navigate to the location of your saved CSS file, select it, and click Choose.

From now on, Safari will default to the zoom level specified in your style sheet file, which you can edit at any time.
Force Websites to Use Bigger Font Sizes
Finally, there's an option in Safari that lets you force websites to display text using a minimum font size, without affecting the zoom level.
- In Safari's menu bar, select Safari -> Preferences....
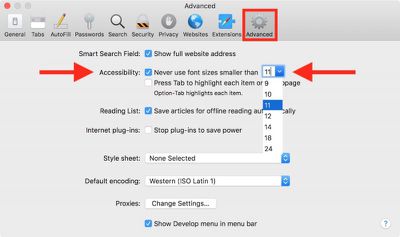
- Select the Advanced tab.
- In the Accessibility section, check the box next to Never use font sizes smaller than: and select a font size in the dropdown.






Top Rated Comments
I also use the Cmd-Opt-+ sometimes, with Cmd-0 to reset to normal size (regardless of how many '+' or '-' you've done).