If you've ever wanted to screenshot your Mac's desktop or record a video of it but don't know quite how to do so, then you've come to the right place. Keep reading to learn how you can record any Mac desktop activity in just a few simple steps.
Recording the activity on your Mac's screen can be useful for a number of reasons. For example, if you want to teach someone how to perform a particular function on their Mac, you could record a mini tutorial showing them how it's done.
Or maybe you want to demonstrate a bug or some odd Mac behavior, in which case you could make a video showing it in action. Either way, it's easy to capture a recording when you know how.
In macOS, Apple includes a Screenshot app in the Applications/Utilities folder which provides a screen capture interface that unifies the screenshot and screen recording features on Mac, making them easier to access from one place. You can also get to it by hitting the keys Command-Shift-5 on your keyboard.
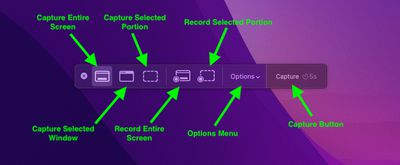
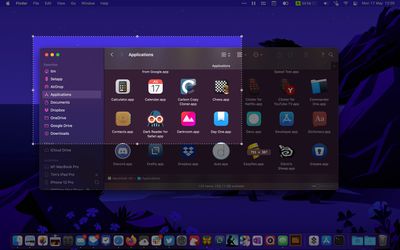
In the Screenshot app's overlay, immediately to the left of the Options button are two buttons to begin a screen recording, either taking in the whole screen or just a portion of the action.
If you want to capture a selected portion of the screen, click Record Selected Portion, then use the mouse cursor crosshairs to select the area you want to capture. Once you're ready, click the Record/Capture button in the floating overlay. When you take the screen recording, a button will appear in the menu bar for you to click when you're ready to end the recording.
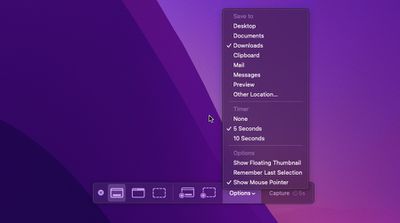
The Options menu lets you control a handful of other variables, like where you want your recordings to be saved (Desktop, Documents, Clipboard, and so on) and whether to include a 5 or 10-second delay before the recording takes place, giving you time to get your screen in order.
As you'd expect, unchecking the Show Mouse Pointer option ensures the mouse cursor doesn't appear in your capture. There's also a Remember Last Selection option, which is handy if you want to capture a particular part of the screen several times consecutively. The Show Floating Thumbnail option takes a little more explaining.
When you take a screenshot or screen recording, a floating thumbnail appears in the bottom corner of the screen, just like it does when you take a screenshot on an iOS device.
Clicking on the thumbnail opens the capture in a window, which includes image Markup tools, or a clip trimming option in the case of recordings, as well as options to share the image/recording or delete it if it didn't turn out like you wanted.
If you're taking multiple video clips in sequence, you probably won't want the floating thumbnail showing up in subsequent captures, which is why the option to turn it off exists.
By default, screen recordings are saved in .MOV format, which can be viewed in Apple's QuickTime Player as well as many third-party video playback apps such as VLC, making your video clips easy to share with others.
For tips on controlling the behavior of screenshots using keyboard shortcuts, check out our dedicated how-to article on the subject.


