![]() In iOS, the Portrait mode in Apple's Camera app uses the dual cameras of your iPhone to create a depth-of-field effect, allowing you to compose a photo that keeps your subject sharp with a blurred background.
In iOS, the Portrait mode in Apple's Camera app uses the dual cameras of your iPhone to create a depth-of-field effect, allowing you to compose a photo that keeps your subject sharp with a blurred background.
On iPhone X and later, and iPhone 8 Plus, Apple also includes a Portrait Lighting feature that you can use to apply studio-quality lighting effects to your Portrait mode images.
And with iOS 13, Apple added a new adjustment tool to Portrait Lighting effects that allows you to further tweak the intensity of the lighting, which can drastically change the look of a Portrait image. This article shows you how to access the new tool.
Before you follow the steps below, bear in mind that these Portrait Lighting adjustment tools are only available on iPhone XS, XS Max, and XR devices.
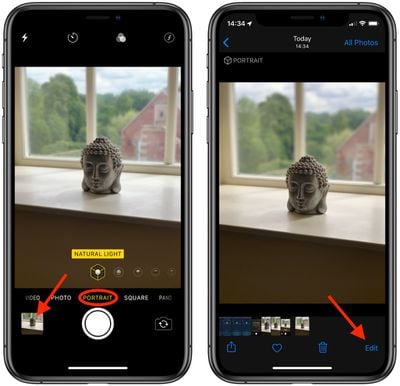
- Open the stock Camera app on your iPhone (tap the Camera icon on the Lock screen, open the app from the Home screen, or launch the Camera from Control Center.)
- Select Portrait mode and take a picture, then tap it in the preview box at the bottom-left corner of the screen.

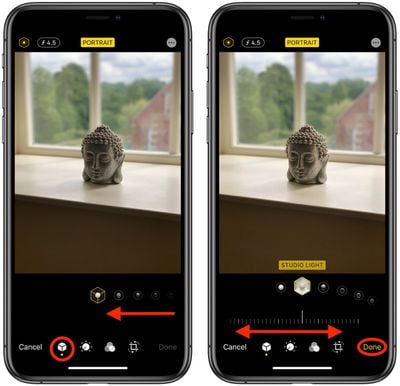
- Tap Edit in the bottom-right corner of the screen.
- With the Portrait icon selected in the bottom row of tools, select a lighting mode by sliding your finger along the icons below the photo.

- Once a lighting mode is selected, you'll see a slider appear below it. Slide your finger along it to dial down or ratchet up the intensity of the selected lighting mode.
- Tap Done when you're happy with how the image looks.
Remember, you can access the same lighting adjustment tool from the Photos app – simply select a photo captured in Portrait mode from your collection and tap Edit to bring up the editing interface.


