In macOS, you can easily convert the format of images using a Quick Action in Finder or you can achieve the same thing via the Preview app, but if your daily workflow requires you to repeatedly convert images – for uploading to a blog, for example – then using a Folder Action can be a much faster way of getting the job done.
In this article, we'll show you how to use the macOS Automator app to create a very simple Folder Action that will automatically convert images dropped into a specific folder, without you having to manually apply a Quick Action or open an image editing app. Keep reading to learn how it's done.
How to Create an Image Converting Folder in Automator
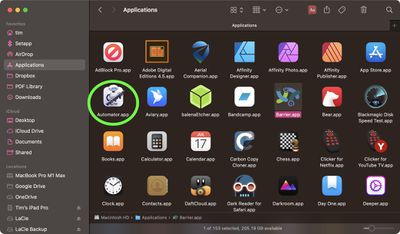
- Launch Automator from the Applications folder.

- Click New Document.
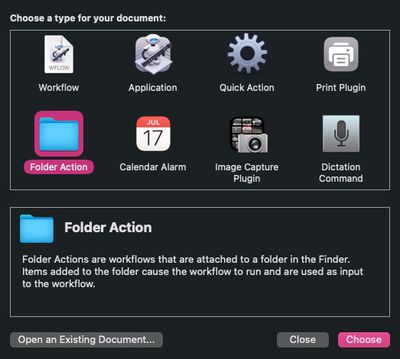
- Choose Folder Action as the type of your document.

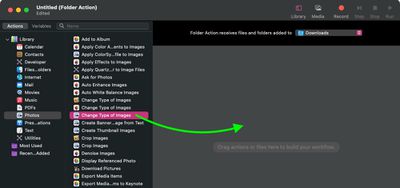
- At the top of the workflow area, click the dropdown next to Folder Action receives files and folders added to: then select Other....

- Select the folder that you'd like to attribute the image conversion action to. In our example, we're choosing the Downloads folder.
- From the Library sidebar on the far left, select Photos.
- From the Actions column, drag Change Type of Images (the one with the Preview icon) to the workflow area.

- A dialog prompt will appear. If you want your action to convert copies of images placed in the folder and preserve the originals, select Add. If you want it to convert the original images, select Don't Add.
- In the Change Type of Images action panel, choose the type of format that you want images to be converted to. We're selecting JPG.

- In the Automator menu bar, select File -> Save... or press Command-S, call your new file action "Convert Image," then click Save.
That's all there is to it. Next time you want to convert an image into your preferred format, simply drag it into the folder that you assigned the action to.
Now that you know how to create the image conversion workflow in Automator, you may want to turn it into a standalone "Application," the option for which you can find in Automator's document menu. An "Application" is a self-running workflow that acts as a droplet – any files or folders dropped onto it are used as input to the workflow. In other words, you could add an "Application" to your Dock and drop images onto it for conversion.
You can also import Automator workflows into the Shortcuts app. Shortcuts can convert most Automator workflows into shortcuts that carry out the same functions, events and automations — you simply drag a workflow file into Shortcuts and the conversion happens automatically.













Top Rated Comments
PNG to WEBP
Use: sh Png2webp Folder_Source
#!/usr/bin/env bash
# Png2jpg Image converter Script
# Variables
SRC="$1"
DEL="$SRC/delete"
clear
if [ -e "$DEL" ]
then
echo "\n"
else
mkdir "$DEL"
fi
echo "PNG Converter\n"
echo "#############\n"
test=`ls -l "$SRC"/*.png`
if [ $? -eq 0 ]; then
for file in "$SRC"/*.png; do
#sips -s format jpeg -s formatOptions 70 "${file}" --out "${file%png}jpg";
cwebp -metadata all -q 100 "${file}" -o "${file%png}webp";
done
mv "$SRC"/*.png "$SRC/delete"
else
for file in "$SRC"/*.PNG; do > /dev/null 2>&1
#sips -s format jpeg -s formatOptions 70 "${file}" --out "${file%png}jpg";
cwebp -metadata all -q 100 "${file}" -o "${file%PNG}webp";
done
mv "$SRC"/*.PNG "$SRC/delete" > /dev/null 2>&1
fi
PNG to JPG
Use: sh Png2jpgFolder_Source
#!/usr/bin/env bash
# belPng2jpg Image converter Script
# Variables
SRC="$1"
#DEST="${SRC} jpg"
clear
mkdir "$SRC/delete"
# for i in *.png; do sips -s format jpeg -s formatOptions 70 "${i}" --out "${i%png}jpg"; done
for file in "$SRC"/*.png; do
sips -s format jpeg -s formatOptions 70 "${file}" --out "${file%png}jpg";
done
mv "$SRC"/*.png "$SRC/delete" > /dev/null 2>&1
for file in "$SRC"/*.PNG; do
sips -s format jpeg -s formatOptions 70 "${file}" --out "${file%PNG}jpg";
done
mv "$SRC"/*.PNG "$SRC/delete" > /dev/null 2>&1