Creating a macOS installer on a bootable USB drive provides a convenient way of installing a fresh copy of macOS on multiple Macs, and also allows you to perform a clean installation quickly and easily.
If you tried to run your installer recently and unexpectedly received an error that it is damaged and can't be used, then don't worry – keep reading for a simple and straightforward way to fix it.
Why is my macOS Installer Damaged?
If you tried to use a macOS installer in the last few days or weeks, you may have been met with an error message saying something like "This copy of the Install macOS Mojave.app application is damaged, and can’t be used to install macOS."
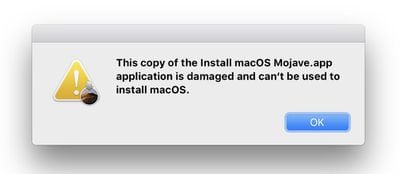
As Apple explains in a newly published support document, the likely reason for the "damaged" error message is an expired certificate. Happily though, the fix is very simple.
How to Fix a Damaged macOS Installer
To fix the damaged installer, you should just download the installer again. Doing so will also ensure that you have all of the macOS updates that have been released since you made the original installer, meaning you won't have to update macOS immediately after the initial installation is complete.
You can find the latest official download links below for the last six versions of Apple's Mac operating system, all of which contain a new certificate that has not expired:
To learn how to perform a clean installation of macOS using the bootable USB drive method, click one of the following links: macOS Catalina, macOS Mojave, macOS Sierra.










Top Rated Comments
I got the same result.
The reproducibility of the bug makes it very suitable to apple for a bug report.
I have submitted the bug report to apple.
To do this copy and paste these into terminal to make the bootable iso file (assuming you have the Sierra installer in your Applications folder):
hdiutil attach /Applications/Install\ macOS\ Sierra.app/Contents/SharedSupport/InstallESD.dmg -noverify -nobrowse -mountpoint /Volumes/install_app
hdiutil create -o /tmp/Sierra.cdr -size 7.85g -layout SPUD -fs HFS+J
hdiutil attach /tmp/Sierra.cdr.dmg -noverify -nobrowse -mountpoint /Volumes/install_build
asr restore -source /Volumes/install_app/BaseSystem.dmg -target /Volumes/install_build -noprompt -noverify -erase
rm /Volumes/OS\ X\ Base\ System/System/Installation/Packages
cp -rp /Volumes/install_app/Packages /Volumes/OS\ X\ Base\ System/System/Installation/
cp -rp /Volumes/install_app/BaseSystem.chunklist /Volumes/OS\ X\ Base\ System/BaseSystem.chunklist
cp -rp /Volumes/install_app/BaseSystem.dmg /Volumes/OS\ X\ Base\ System/BaseSystem.dmg
hdiutil detach /Volumes/install_app
hdiutil detach /Volumes/OS\ X\ Base\ System/
hdiutil convert /tmp/Sierra.cdr.dmg -format UDTO -o /tmp/Sierra.iso
mv /tmp/Sierra.iso.cdr ~/Desktop/Sierra.iso
A bootable iso file called Sierra.iso will then appear on your desktop and you can use this to burn it to a dual layer dvd:
sudo drutil burn /Users/YOURNAME/Desktop/Sierra.iso
where you replace "YOURNAME" with the username for the account you are logged into at the time.
and then boot to startup manager with option key to select the dvd.
Just be aware though that a bootable dvd takes a lot longer to boot up than a bootable usb.