![]() In a previous how-to, we explained how to add a special stack to your Mac's Dock that enables quick access to recently opened or favorite items.
In a previous how-to, we explained how to add a special stack to your Mac's Dock that enables quick access to recently opened or favorite items.
This unique stack can be configured to show your most recently opened apps, documents, or servers, but what you can't do is make it show all your recent items, regardless of kind.
One solution is to add a recently opened items folder to your Dock instead. The following steps guide you through the process of creating one using Finder's smart folder feature.
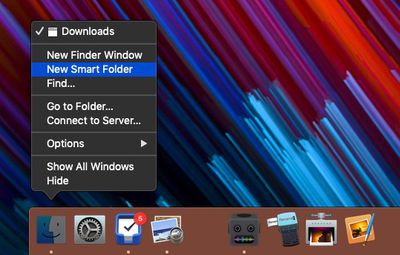
- Open a Finder window and select File -> New Smart Folder in the menu bar. Alternatively, right-click (or Ctrl-click) the Finder icon in your Dock and select New Smart Folder.

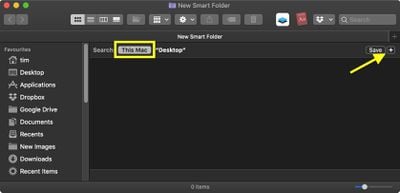
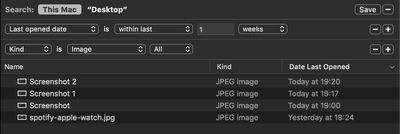
- In the Finder window that opens, make sure the search header is selected as This Mac, then click the plus icon in the upper right of the viewing area.

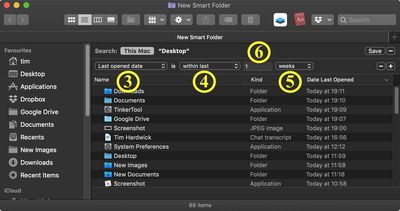
- Select Last opened date in the first search criteria dropdown.
- Select within last in the second dropdown.
- In the third and final dropdown, select how far back you'd like the folder to show recently opened items for. Your options are days, weeks, months, and years.
- In the input field to the left of your timescale selection, specify the number of days/weeks/months/years of recently opened files to show.

- To restrict your recent items folder to a certain kind of file – images, for example – click the plus button to add another row, then select a kind from the second dropdown. (Depending on the kind you select, you may be offered an additional dropdown to further limit the criteria.)

- Now, hold down the Option key. Note how the plus icon at the end of the row changes to an ellipsis. Click this, and you'll be able to add search parameters that exclude certain items like applications and folders from your recents list.

- In the second row dropdown, select None of the following are true.
- In the third row, first dropdown, select Kind.
- In the third row, second dropdown, select the type of item you wish to exclude.

- If you want to add more exclusion criteria, hold the Option key and click the ellipsis icon in the first row. When you're done, click Save in the upper right of the viewing area.

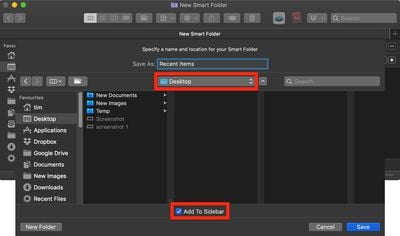
- In the save dialog that appears, give your smart folder a name, and select your Desktop as the location for your folder. You can also opt to include the folder in Finder's sidebar by checking the box next to Add to Sidebar.

- Click Save.
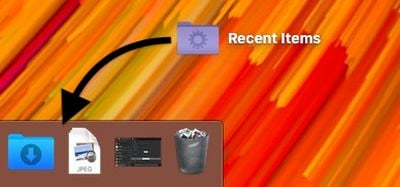
- Switch to your Desktop and drag and drop your new smart folder to the right of the the Dock, which will automatically move any existing icons behind the divider to make space for it. (If you like, you can delete the same folder on your Desktop once it's safely docked.)

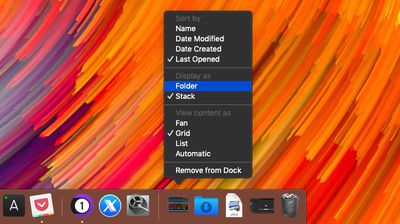
- Finally, right-click (or Ctrl-click) the docked smart folder and select Folder in the contextual menu.

The last step gives your recently opened items folder a distinctive icon in the Dock.
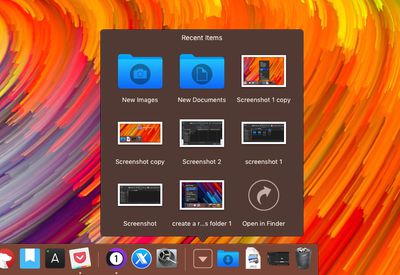
Note that the same contextual menu also provides view and sort options to further customize the folder's behavior.


















Top Rated Comments
In this screenshot, wouldn't one want to search "This Mac" instead of just the Desktop? Otherwise it's going to be a pretty narrow set of results....
You don't have to leave it on your Desktop if you don't want to. I chose to save the Smart Folder to my Documents folder where it's out of the way.
Oh, and if anybody's interested, you can edit the Saved Search by opening it in Finder and selecting "Show Search Criteria" from the little gear menu.
It's also worthwhile while doing the search criteria to add additional filters after you specify the date one. Lots of useful options there like restricting your Kind to Documents to filter out apps. You can stack up these search criteria as you see fit and see the results in real-time as you tweak. Worth futzing with, and you can always create separate smart searches for specific things, like "PDFs from the last 30 days with the name XXXXX" or whatever.