If you've installed an iOS beta either through Apple's developer program or the public beta testing website, you may find yourself wanting to downgrade if you've run into issues. iOS beta software can be notoriously buggy, especially during the first few betas of a major update.
Apps often don't work, devices crash, battery life is poor, and entire features can be rendered non-functional. In some cases, these problems are a big enough deal that users will want to downgrade back to the more stable release version of iOS.
It's possible to restore your iPhone or iPad to the release version of iOS, but you're going to need an archived iTunes backup to restore your iPhone or iPad to its pre-beta state, so hopefully you have one on hand (this is the first step in any beta installation).
If not, downgrading will require wiping your device, so you'll need to start from scratch with apps, accounts, and preferences. Here are the steps to downgrade:
- Turn off Find My iPhone in the iCloud section of the Settings app.
- Turn off the iPhone or the iPad.
- Hold down the Home button while plugging the device into a PC or Mac running iTunes.
- Continue to hold down the Home button until the iTunes logo pops up on the device display. This is called recovery mode.
- If you don't see the iTunes logo, entering recovery mode did not work. Repeat steps 2 to 4.
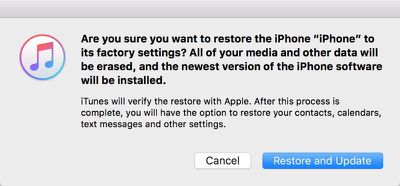
- When recovery mode is successful, an iTunes popup will show up on your Mac or PC. Click on "Restore." A warning will pop up letting you know the device will be erased.
- Click on "Restore and Update" to bring up the iPhone Software Update menu, which will display details about the current publicly available version of iOS. Click "Next" and then "Agree" to agree to the terms and conditions and start the restoration process.
- iTunes will download the current version of iOS and the restore will begin.
Restoring this way results in a clean installation of the current release version of iOS. All apps and data will be erased, which is why you want an archived iTunes backup to restore all of your information. It will take a several minutes for the recovery process to complete, but once it's done, the next step is to restore from a backup.

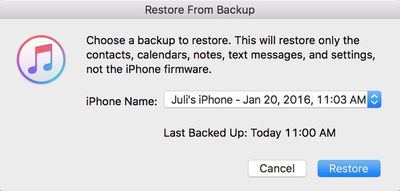
- Choose "Restore Backup" in iTunes.
- Select the archived backup.
- Click on "Restore" to confirm that you want to begin the backup restoration process.
When the install is complete, your iOS device will be restored to the condition that it was in prior to the beta. If you do not have an archived backup to work with, your device will need to be set up from scratch.
This how to is part of our iOS beta installation series. To see the rest of the steps involved with upgrading to a beta, make sure to check out our how tos on creating an archived iTunes backup and the steps to download the beta.


Top Rated Comments
I just had to wait a couple weeks while on a Beta to get back on Stable and didn't need to faff around with restorations. Also last time I tried to restore my phone from backup it failed. The backup was not corrupted but an app installed on my Phone got backed up and it was for whatever reason unable to be restored to my iPhone and that stopped the entire restoration from being able to complete.
I had to get a 3rd party app that could open and modify the backup to fix the issue.
I'm running iOS Public Beta 9.3 on iPhone 5s with my Apple Watch and no problems
Just complete steps 1 through 5. Now for step 6, instead of clicking "Restore", just click the "Update" button and continue the process of downgrading to the latest non-beta version, no backup or significant data loss required (see newer post).
If you don't want to take my word for it, check out this link ('http://www.imore.com/how-downgrade-ios-91-beta-back-ios-9') along with the user comments at the bottom of the page.