
Apple has made its stock Notes app a lot more useful in recent versions of iOS and iPadOS, adding several features that rival notes apps have offered for a while. One of these features is the ability to create checklists. Here's how it works.
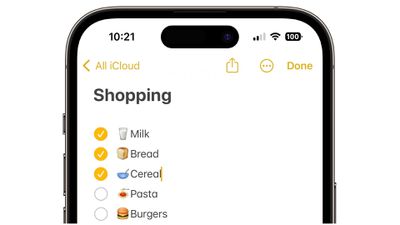
When you create a checklist in Notes, each list item has a circular bullet next to it that can be marked as completed, which is convenient for checking off grocery lists, wish lists, to-do lists and so forth.
The steps below will help you get your first checklist up and running. But before you start, make sure that you set up Notes with iCloud or have your notes saved on your device. To set up Notes with iCloud, go to Settings -> Notes -> Default Account, then select iCloud. To set up Notes on your device only, go to Settings -> Notes, then select "On My [device]" Account.
How to Create a Checklist in Notes
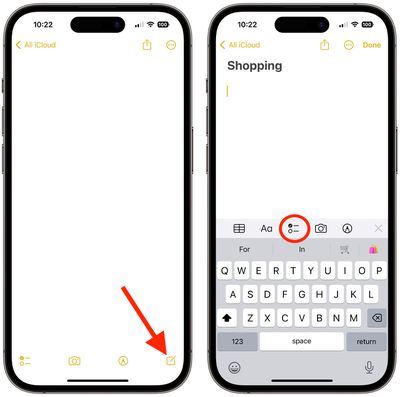
- Open the Notes app, then tap the Compose button in the bottom-right corner of the screen to create a new note.
- Enter a title for your note and tap return.
- Tap the Checklist button in the toolbar above the keyboard to start your list. Each time you tap return, a new item is added to the list.

- Tap the empty circle next to an item to mark it as complete.
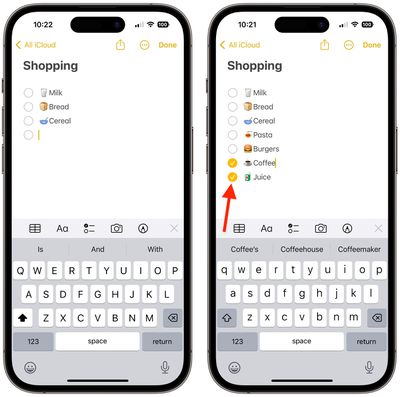
That's all there is to it. If you want to create a list in an existing note, simply place the cursor where you want to start it, then tap the Checklist button.
How to Organize a Checklist
Once you've created a checklist, you can organize it in several ways. Here are a few of the things you can do:
- Reorder items with drag and drop: Simply drag the item in the list to the place you want.
- Swipe to indent items: Swipe right across a list item to indent it and left to reverse the indent.
- Move checked items to the bottom automatically: Go to Settings -> Notes, tap Sort Checked Items, then tap Manually or Automatically.
How to Share a Checklist
- Open the Notes app.
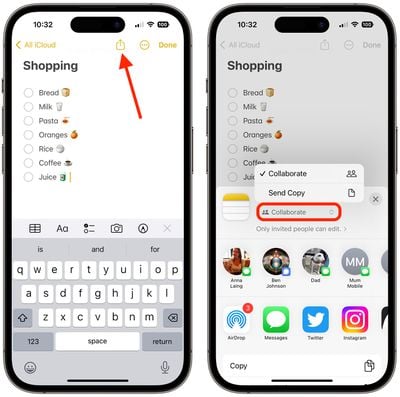
- Go to the note with the list, then tap the Share button (the square with an arrow pointing out) in the top-right corner of the screen.
- Choose Collaborate to let others edit the note or just Send a Copy, then choose how you want to send your invitation.
Did you know that you can include hashtags in your notes which can help you organize them and find stored notes more easily? Check out our dedicated how-to article for all the details.