![]() Backing up the photos you take on your iPhone might not sound like a thrilling prospect, but it's far from a thankless task. On the contrary, it's a crucial step in ensuring that your most precious pictures are never lost. Plus, once you have a system for backing up your photos in place, you can get on with enjoying taking pictures with your smartphone in the confidence that they're safe.
Backing up the photos you take on your iPhone might not sound like a thrilling prospect, but it's far from a thankless task. On the contrary, it's a crucial step in ensuring that your most precious pictures are never lost. Plus, once you have a system for backing up your photos in place, you can get on with enjoying taking pictures with your smartphone in the confidence that they're safe.
You see, having a backup of your photos prevents them from being lost if you should ever lose your iPhone, or if your handset breaks. And if your device's capacity is slim, an additional benefit of backing up your iPhone's photo library is that it also allows you to save local storage space. With that in mind, let's look at your backup options.
1. Backing Up to iCloud
![]() First up, there's Apple's homegrown solution: iCloud Photos works with the Photos app to keep your photos and videos securely stored in iCloud, and up to date across your Apple devices and on iCloud.com.
First up, there's Apple's homegrown solution: iCloud Photos works with the Photos app to keep your photos and videos securely stored in iCloud, and up to date across your Apple devices and on iCloud.com.
iCloud Photos automatically keeps every photo and video you take in iCloud, so you can access your library from any device, whenever you want. Any changes you make to your photo library on one device are reflected on your other devices, ensuring a consistent experience wherever you choose to browse your pictures.
When you sign up for iCloud, you automatically get 5GB of free storage. If you need more space, you can buy more iCloud storage, with plans starting from $0.99 a month for 50GB. There are also 200GB and 2TB plans available that also let you share your storage with your family.
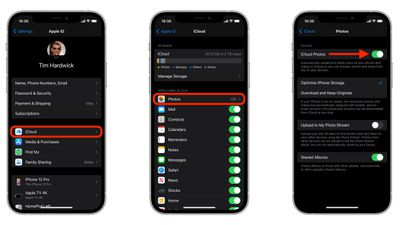
To turn on iCloud Photos on your iPhone, follow the steps below:
- Launch the Settings app.
- Tap your Apple ID banner.
- Tap iCloud.
- Tap Photos, then turn on iCloud Photos by toggling the switch.
2. Backing Up to a Computer
If you want to keep your backups local, you can always just back up your iPhone to your computer. If you already sync your iPhone through Finder on a Mac, or via iTunes on a Windows PC, then you're already backing up your photos to your computer.
- How to Back Up Your iPhone to a Mac
- How to Back Up iPhone on Macs Running Mojave or Earlier
- How to Back Up Your iPhone to a Windows PC
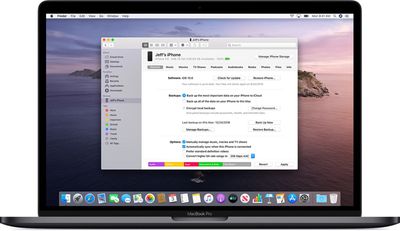
One disadvantage to this method is that you don't have direct access to your backed up photos, so you can't just browse them whenever you want unless they're still on your iPhone. You have to restore the backup file to your iPhone to view or manage your stored photos. In that sense, having a backup of your photos on your computer offers peace of mind in case your iPhone is lost or breaks, but ultimately it lacks the convenience of iCloud Photos or third-party storage alternatives.
3. Alternative Backup Options
If you don't want to be restricted to iCloud or a computer backup, or you just want another backup for redundancy, there are some third-party options available for backing up your iPhone photos. Two of the most popular are Dropbox and Google Photos. Both of these services offer free plans that will happily back up your iPhone's photo library, although with some caveats if you're prepared not to shell out for the privilege.
Google Photos
![]() Each Google account comes with 15GB of free storage that can be used to store any type of file, including your photos. If you choose to back up photos in their original quality, they will count against your storage quota.
Each Google account comes with 15GB of free storage that can be used to store any type of file, including your photos. If you choose to back up photos in their original quality, they will count against your storage quota.
Currently, if you choose to back up photos in high quality, you get unlimited free storage, although that will no longer be the case from June 1, 2021. After that date, all photos and videos uploaded to your Google account will take up your allocated storage.
To back up your iPhone's photo library to your Google account, follow these steps:
- Download the Google Drive app for iPhone from the App Store.
- Launch the app and create a Google account or log in using your existing Google credentials.
- Tap the triple-lined icon in the top-left corner of the app interface, then select Settings.
- Tap Backup.
- Select Photos & videos and toggle on the switch next to Back up to Google Photos, then select High quality (free unlimited storage) or Original (full resolution - counts against your storage quota).
- Return to the previous screen and tap Start Backup.
If you're looking for an alternative way to browse your photos on iPhone, try the Google Photos app, where you can also control backup options.
Dropbox
Dropbox can back up the photos on your iPhone as they're taken, thanks to Camera uploads. With this feature, your iPhone will automatically add your camera roll's photos to Dropbox and will also ask you if you want to back up your existing library.

However, expect to pay a subscription if you want to back up photos to Dropbox. The free Basic plan only includes 2GB of storage, which won't go very far at all. However, the Plus plan ($7.99 a month) gets you 2TB of encrypted storage and the ability to use Dropbox Rewind, a 30-day data recovery service.
To back up your iPhone's photo library to Dropbox, follow these steps:
- Download the Dropbox app for iPhone from the App Store.
- Launch the app and sign up to Dropbox or log in using your existing credentials.
- Tap Account (the person icon) in the bottom-right corner of the interface.
- Tap Camera Uploads.
- Toggle on the switch next to Camera Uploads.
- Tap Upload.
Background uploading allows Dropbox to upload photos even when the Dropbox app is closed. It automatically uploads your photos whenever it detects a change in your device's location. To turn it on, navigate to the Camera Uploads screen, tap Background uploading, then use the slider to select the battery level or toggle Only while phone is charging to on.


