Apple introduced two-factor authentication (2FA) in 2015 to provide an enhanced level of security when accessing Apple ID accounts. With 2FA enabled, you'll be the only person who can access your account, regardless of whether someone learns your password – as the result of a hack or a phishing scam, for example – so it's well worth taking the time to enable the feature. In this article, we'll show you how.
How Two-Factor Authentication Works
2FA offers hardened security during login attempts by requesting that the user provides an extra piece of information only they would know.
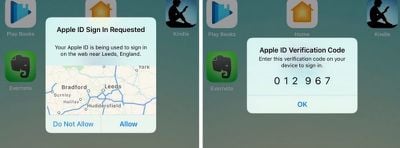
With 2FA enabled on your Apple ID account, the next time you try to log in you will be automatically sent a six-digit verification code to all the Apple devices you have registered to that Apple ID. If you try to access the account from an unknown device or on the web, 2FA also displays a map on all registered devices with an approximate location of where the Apple ID login attempt occurred.
In basic terms, this is an improved version of Apple's older two-step verification method, which prompted users to send a four-digit code to a registered SMS-capable device. Apple automatically upgraded most two-step verification users to 2FA as of iOS 11 and macOS High Sierra, but if you're still on two-step verification for some reason, follow the steps below to manually upgrade to 2FA.
How to Turn Off Two-Step Verification
- Open a browser and go to appleid.apple.com
- Enter your Apple ID and password in the login fields.
- In the Security section of your account page, click the Edit button on the right.
- Check to make sure two-step verification is enabled rather than two-factor authentication, and click Turn off two-step verification.
How to Turn On Two-Factor Authentication in iOS
To turn on 2FA using an iPhone or iPad, it needs to be running iOS 9 or later. Note that if you're running iOS 10 or later and you have any other, older devices tied to your Apple ID that aren't compatible with 2FA, you'll receive a compatibility warning during the setup process.
On top of that, you'll also be asked to append a six-digit code to the end of your password whenever you authenticate a login on your older devices in future. You can potentially avoid this hassle by updating those devices to the latest version of iOS or macOS where possible.
With that in mind, perform the following steps on your iOS device:
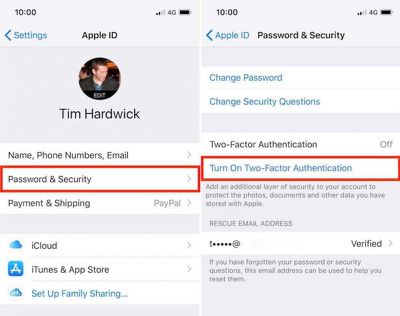
- Open the Settings app and tap your Apple ID banner at the top of screen.
- Tap Password & Security.
- Tap Turn On Two-Factor Authentication, and then tap Continue on the next screen.
- Tap Turn On Anyway if you see a compatibility warning about older devices.
- Check your phone number is correct. (If it isn't, tap Use a Different Number at the bottom of the screen and input a new number.)
- Select Text message or Phone call for verification, and then tap Next.
- Enter your Passcode.
How to Turn On Two-Factor Authentication on a Mac
If it's a Mac you're using to enable two-factor authentication then make sure it's running OS X El Capitan or later. To turn on 2FA on Mac, follow these steps:
- Click the Apple () symbol in the menu bar at the top left of the desktop, and select System Preferences.
- Click the iCloud preferences pane.
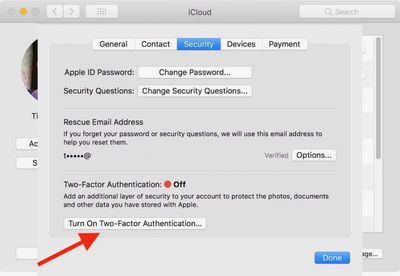
- Click the Account Details button and select the Security tab.
- Click Turn on Two-Factor Authentication, and then click Continue in the drop-down pane.
- Check your phone number is correct and click Continue.
Verification Codes
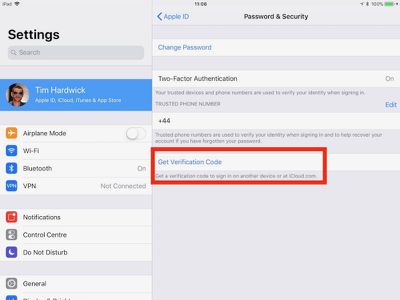
With 2FA enabled, you'll be prompted to enter a new verification code every time you log in to your Apple ID account using iCloud.com or another Mac or iOS device. These codes will automatically appear on devices that are already logged into your Apple ID, but you can also request them manually using an iPhone or iPad, like so:
- Open the Settings app and tap on your Apple ID banner at the top of the screen.
- Tap Password & Security.
- Tap Get Verification Code.


















Top Rated Comments
Personally, I rather have it so I need a recovery key.