An anonymous tipster informed MacRumors that Apple has advised major U.S. carriers to prepare for the launch of eSIM-only smartphones by September 2022. The tipster shared a seemingly legitimate document outlining the timeframe for this initiative, although the document does not specifically mention Apple or the iPhone.
As part of the transition, some U.S. carriers will allegedly start offering select iPhone 13 models without a nano-SIM card in the box in the second quarter of 2022. iPhone 13 models sold at Apple Stores or on Apple.com already lack a nano-SIM card in the box, with users typically able to activate a cellular plan via eSIM by turning on the iPhone, connecting to a Wi-Fi network, and following the on-screen instructions.
Given the alleged September 2022 deadline, it is possible that Apple might remove the physical SIM card slot starting with some iPhone 14 models, rather than some iPhone 15 models as originally rumored, but nothing is definitive at this point.
An eSIM is a digital SIM that allows users to activate a cellular plan without having to use a nano-SIM card. It's worth noting that eSIM service is not available in all countries, so iPhones with a SIM card slot may remain available in some markets. Adoption is expanding rapidly, though, with over 100 carriers offering eSIM service worldwide and more planning to roll out support in 2022, including Three in the UK and Vodafone in New Zealand.
iPhone 13 models already support multiple eSIM profiles, allowing users to subscribe to several cellular plans digitally and switch between them, and this functionality could pave the way for the SIM card slot's removal in select countries.
Apple's former design chief Jony Ive once envisioned the iPhone as becoming a "single slab of glass," and the SIM card slot's removal would be another step towards a seamless design and improve water resistance in the process. Taking out the slot would also free up some valuable internal space in the iPhone — every bit counts.
Update: Leaker @dylandkt, who has a respectable track record with Apple rumors, tweeted that they are "in agreement with recent rumors regarding the removal of the physical SIM card tray."
I am in agreement with recent rumors regarding the removal of the physical SIM card tray. In February, I had shared the following information below: https://t.co/zOyeJr0V1d
— Dylan (@dylandkt) December 27, 2021
Apple gift cards are always a popular gift for Christmas and other holidays. If you unwrapped one this year, we've put together a list of 23 ways to spend it, with all of the ideas for what to buy costing under $100 in the United States.
Keep in mind that Apple used to offer two separate gift cards, including an Apple Store gift card for in-store products and an iTunes gift card for purchasing content like apps, games, TV shows, and movies. These gift cards have since been combined into the all-in-one Apple gift card, which says "the gift card for everything Apple" on the packaging.
To redeem an Apple gift card on an iPhone or iPad, open the App Store, tap your photo in the top-right corner, and tap Redeem Gift Card or Code.
If you were lucky enough to get a new iPhone 13 for the holidays, we've got a series of useful tips and tricks for you that will help you get the most out of your new device.
First, if you are new to iPhone entirely, we have a long list of basic tips on how to use your iPhone and iOS 15.
Beyond the basics, here are 10 more useful tips about your new iPhone:
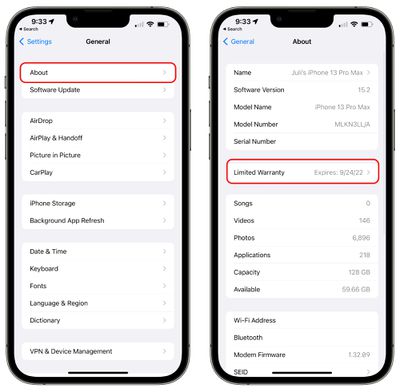
1. Check Your iPhone Warranty
If you need a repair, want to pick up AppleCare+ for your new iPhone, or just want to see your warranty status and what's available to you, you can do it right on your device.
Open up the Settings app.
Tap on "General."
Tap on "About."
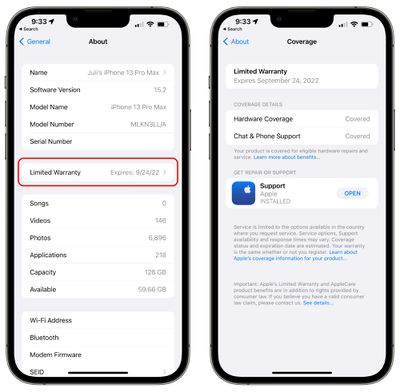
Tap on "Limited Warranty" or "AppleCare+" to see your device status.
If you have AppleCare+, the section will be labeled with AppleCare+ and will let you know your AppleCare expiration date. If you don't, it will say "Limited Warranty" and it will let you know when it expires.
AppleCare+ is good for two years or indefinitely if you renew it monthly or yearly, and it covers manufacturer issues and two incidents of accidental damage per year so long as you pay the deductible. It's generally a good idea if you're accident-prone and want to make sure you can get an affordable fix if you drop or otherwise damage your phone.
The Limited Warranty is Apple's manufacturer warranty that lasts for a year after purchasing your iPhone. It entitles you to hardware support for any manufacturing issues, and it allows for a year of chat and phone support.
With the Limited Warranty, once that year is up, your iPhone is considered out of warranty. If you didn't purchase AppleCare+ when you bought your phone and want to get it, you have 60 days to do so.
2. Auto Schedule Low Power Mode to Save Battery
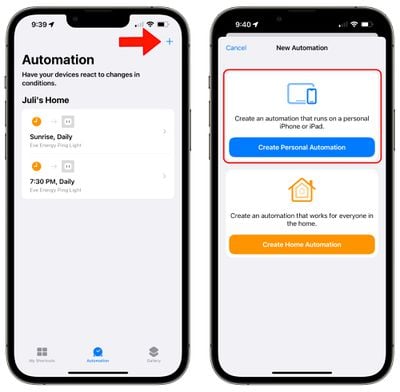
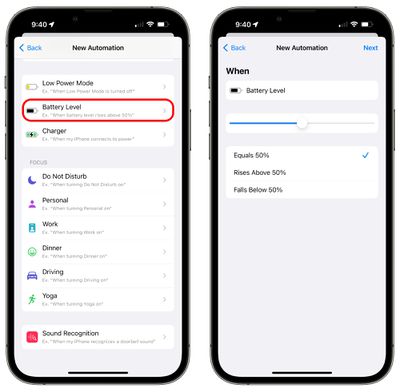
Using the Shortcuts app, you can create an automation that will cause Low Power Mode to come on automatically at a certain battery percentage, so you won't need to turn it on manually.
Open up the Shortcuts app.
Tap on "Automation."
Tap on the "+" button.
Tap on "Create Personal Automation."
Scroll down to "Battery Level."
Tap on the parameter that you want. Options include "Equals x%," "Rises Above x%," and "Falls below x%." You'll want to use "Falls Below" or "Equals" for this Shortcut.
Use the slider to select a specific percentage.
Tap "Next."
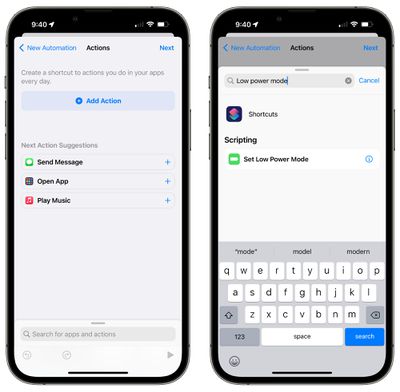
Tap "Add Action."
Search for "Low Power Mode."
Tap on "Set Low Power Mode."
Tap on "Next."
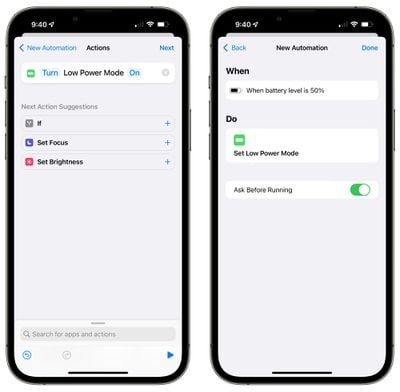
If you want your iPhone to ask you before turning on Low Power Mode, leave the "Ask Before Running" toggle activated. If not, turn it off.
Tap "Done."
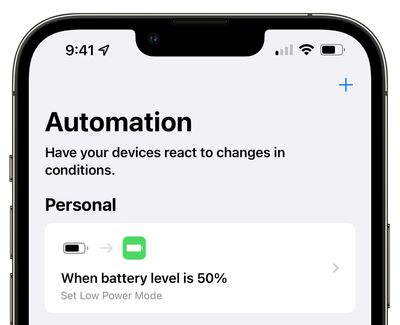
From there, your Shortcut will run any time your iPhone hits the threshold that you set for Low Power mode. You can adjust the setting in the Automation section of the Shortcuts app.
If you want to set Low Power Mode to come on at a certain time, follow the above steps but use "Time of Day" as the first parameter, choose a time, and then follow steps 8 through 14.
Low Power Mode is designed to cut down on background processes to preserve battery life when your iPhone is low on battery, and your iPhone will automatically present a Low Power Mode pop-up suggestion when the battery dips below 20 percent. Using the Shortcuts app to create the Low Power Mode automation is a useful way to get Low Power Mode to come on when your battery is at a higher percentage.
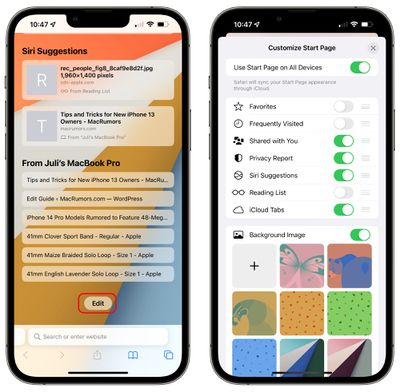
3. Customize Your Safari Start Page
You can change what's displayed on your Safari start page, opting in to (or out of) sections like Frequently Visited, Shared With You, Siri Suggestions, and more, plus you can pick a custom wallpaper.
Open up Safari.
Open up a new blank page.
Scroll all the way down to the bottom of the page.
Tap on "Edit."
Toggle on the sections that you prefer.
Toggle on "Background Image" if you want to pick a custom background for Safari. You can choose from the available Apple-designed backgrounds or use your own photo by tapping on the "+" button.
If you want the same Start Page on all devices where you're signed into iCloud, toggle on "Use Start Page on All Devices" at the top of the page.
When you're all done customizing, tap on the "X" button in the upper right hand corner.
Options that you can toggle on or off include Favorites, Frequently Visited, Shared With You, Privacy Report, Siri Suggestions, Reading List, and iCloud Tabs.
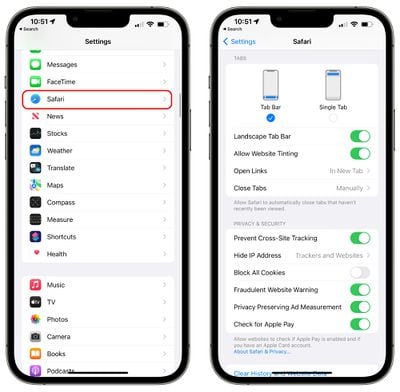
4. Change Your Safari Design
Apple attempted to introduce an overhauled Safari design in iOS 15 with floating tabs and an interface that merged the tab bar and the URL bar, but the changes were not well received and Apple ultimately reverted to the standard iOS 14 Safari design.
Safari Tab Bar on bottom (left), Safari Tab Bar on top (right)
There are still remnants of that new Safari design, though, and you can elect to move your Safari Tab Bar to the bottom of the Safari interface, and you can chose to activate "Allow Website Tinting," a feature that blends the background color of the website with the URL bar when it's positioned at the top.
Open up the Settings app.
Scroll down to Safari.
Under Tabs, select the "Tab Bar" option for a tab bar located at the bottom of the Safari window. Choose "Single Tab" for the top bar.
Toggle on "Allow Website Tinting" if you want to have the color blending feature when using the top bar, and choose "Landscape Tab Bar" if you want to see your open tabs when the iPhone is held horizontally.
Note that "Allow Website Tinting" is a feature that shows up when using the top bar. It causes the URL bar to turn the background color of the website when you scroll down on a page for a more seamless look.
Tip: You can also swap between the top and bottom navigation bars in Safari itself. Just tap on the "Aa" icon in the URL bar and then choose "Show Bottom Tab Bar" or "Show Top Address Bar."
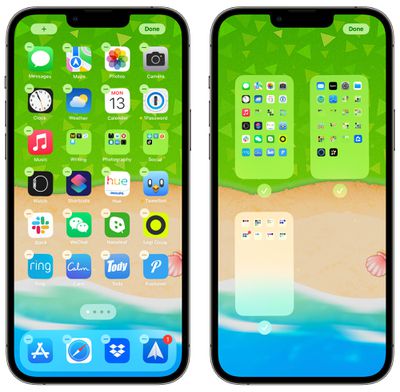
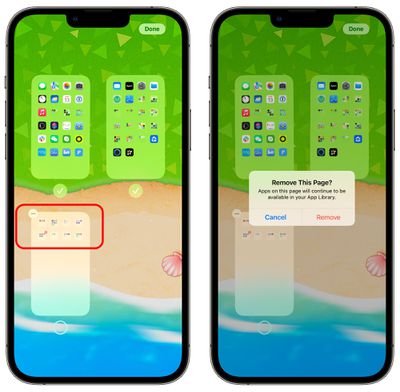
5. Rearrange Your Home Screen Pages
If you want to rearrange your various Home Screen pages that house apps, you can do so quickly and easily.
Press and hold in an empty space on the Home Screen to enter "jiggle mode," where the app icons are wiggling slightly.
Tap on the row of dots at the bottom of the page.
Your Home Screen pages will be shown in a grid view. Put a finger on one page and drag it to move it to a new position relative to your other pages.
Once you have your pages the way you want them, tap on "Done" in the upper right corner.
Tip: You can also delete Home Screen pages using this interface. At the grid view, tap on the checkmark under the page that you want to eliminate, and then tap on the minus (-) icon to delete it.
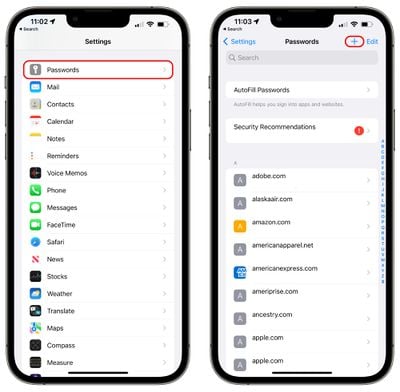
6. Store Two-Factor Authentication Codes in Passwords
It's a good idea to set up two-factor authentication for any online account where the feature is available, and with iOS 15, you no longer need a separate verification code app like Google Authenticator or Authy for storing one-time passwords. Two-factor authentication codes (or one-time passwords) are the secondary passcodes that you use when logging into a website, with these codes regenerated every 30 seconds, which makes it much more difficult for your accounts to be breached.
Apple now has a built-in feature for storing two-factor authentication codes right alongside your iCloud Keychain passwords. Here's how to add a code:
Open up the Settings app.
Scroll down to "Passwords."
If you're adding a two-factor code for a login and password already stored in iCloud Keychain, search for the entry that you're looking for. Otherwise, tap the "+" button to add a new login.
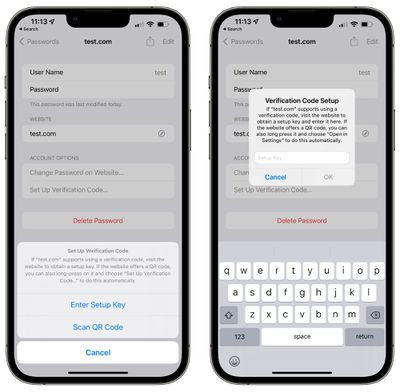
After either accessing your login and password for the account you're interested in or adding new details, tap on "Set Up Verification Code."
Initiate the two-factor authentication process for the website or account where you're enabling two-factor verification.
For many services, you're provided with a QR code that you can scan to set up two-factor authentication, though this does require two devices. If you have a QR code to scan, tap on the "Scan QR Code" option. Alternatively, tap on "Enter Setup Key" and enter the number that you're provided from the website.
After the QR code is scanned or the Setup Key is entered, the login will automatically update with the verification key.
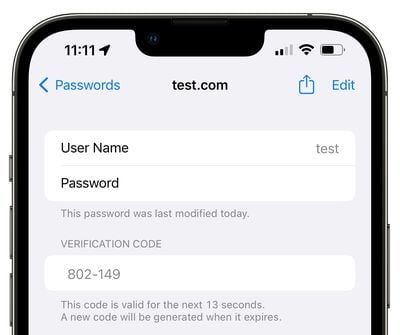
Once set up, you can use the verification code found in the Passwords app whenever you need to verify your identity with a one-time passcode for that website or service. If you hold down on the verification code, you can copy it and then paste it into the site where it's needed, and if you have iCloud Keychain enabled, it will autofill across your devices.
You will need to set this up individually for each website that uses two-factor authentication.
Tip: If you're setting up two-factor authentication on a website on your iPhone, when you see the QR code, long press on it with your finger. You'll see an option to "Add Verification Code in Passwords," and if you tap it, you can automatically add the two-factor verification to your site login without needing to scan a QR code.
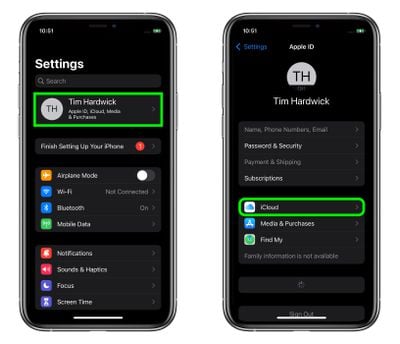
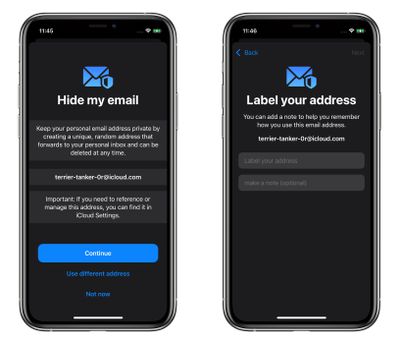
7. Maximize Your Privacy With iCloud Relay and Hide My Email
iOS 15 makes web browsing and sending email more secure by cutting down on the ways that companies can track your online behavior. iCloud Private Relay, for example, obscures personal information like IP address and location, which can be used to track your browsing across different websites. iCloud Private Relay works in the background (if you want to know how, we have a guide) and it does require a paid iCloud account, priced at $0.99 and up per month.
Make sure you have iCloud Private Relay turned on by following these steps:
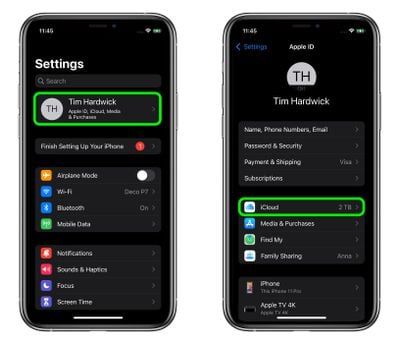
Open up the Settings app.
Tap on your name to open up your Apple ID and iCloud settings.
Tap on "iCloud."
Tap on "Private Relay."
Make sure "Private Relay" is toggled on.
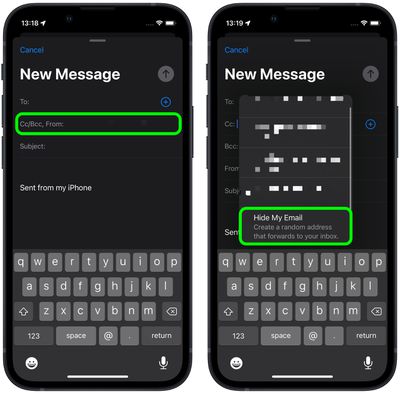
Hide My Email, which also requires a paid iCloud account, lets you create different email addresses for each site, so you can disable them if you start getting spam or other unwanted content from someone you've interacted with. Hide My Email temporary addresses all forward to your main Apple email address and can be easily managed.
You can use Hide My Email in two ways. If you have iOS 15.2 or later installed, it's as simple as opening up the Mail app and composing an email. In the From field, tap and then choose "Hide My Email" to automatically generate a random address that will forward to your inbox.
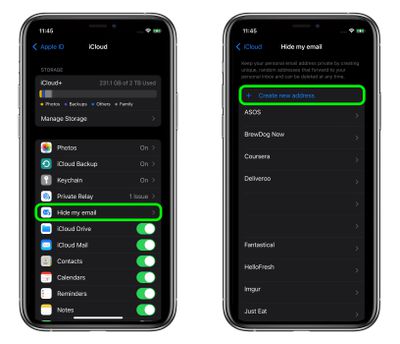
Alternatively, follow these steps:
Open up the Settings app.
Tap on your name.
Tap on "iCloud."
Tap on "Hide My Email."
Tap on the "+ Create New Address" button.
Choose a label for your Hide My Email address.
Tap "Next," then tap "Done" and your randomly generated email address is ready to use.
This Hide My Email interface in the Settings app is also where you can manage all of the temporary email addresses that you've created. You can deactivate any of the temporary email addresses at any time and the company or person that has that email address will no longer be able to contact you.
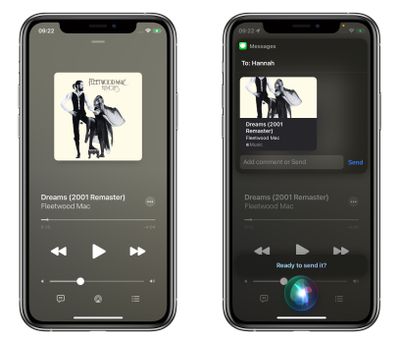
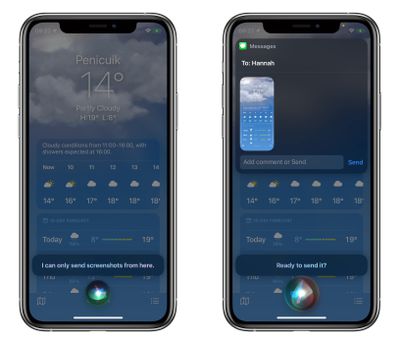
Siri is smarter in iOS 15 with improved contextual awareness, and the personal assistant can now recognize what's on your screen and share it with someone else.
Open up what you want to share, like an Apple Music song.
Say "Hey Siri" to activate Siri.
Say "Share this with [person's name]."
At that point, Siri will confirm your request and ask "Are you ready to send it?" Just reply with a "yes" to send the content along.
If you attempt to share something that isn't naturally shareable, Siri will take a screenshot and send that instead. As an example, if you're in the Weather app and ask Siri to share with someone, Siri will capture a screenshot and send that.
The Siri sharing feature works with Apple Music, Podcasts, Apple News, Maps, web pages in Safari, the Photos app, Messages, and more.
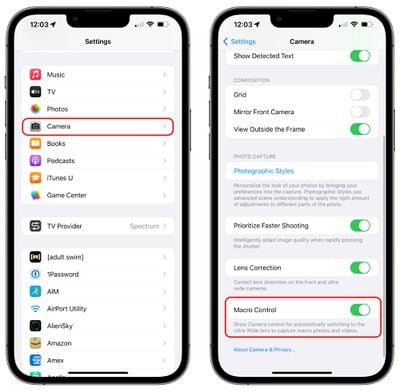
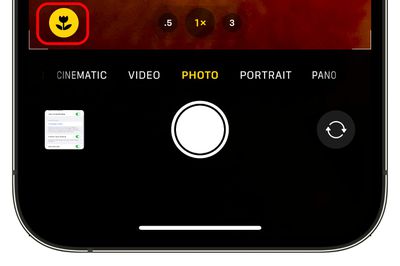
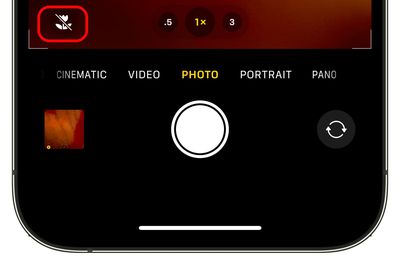
9. Get More Control Over Macro Mode (Pro Models)
The iPhone 13 Pro models have a new Macro functionality enabled by the Ultra Wide camera, but because it turns on automatically by default, it can be annoying. Sometimes when you're holding the camera lens close to an item, the Macro mode will activate even when you don't want it to.
Apple in iOS 15.2 added a toggle that lets you control Macro mode manually by turning it on and off in the Camera app. Here's how to activate it:
Open up the Settings app.
Scroll down and tap on "Camera."
Toggle on "Macro Control."
With Macro Control on, when you go to take a photo and have your iPhone close to an object, you'll see a yellow circle with a flower inside, indicating Macro mode is turned on. To disable it, just tap on the icon.
Macro Mode toggled on
Macro Mode toggled off
To use this Macro Control toggle, you'll need to have iOS 15.2 or later installed, so make sure you've updated your iPhone.
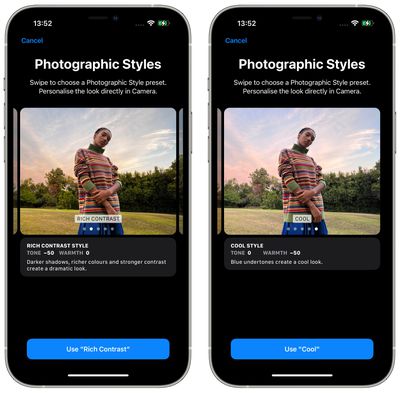
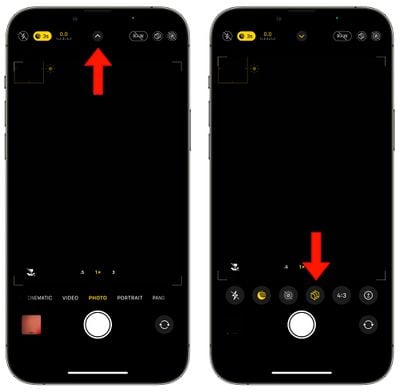
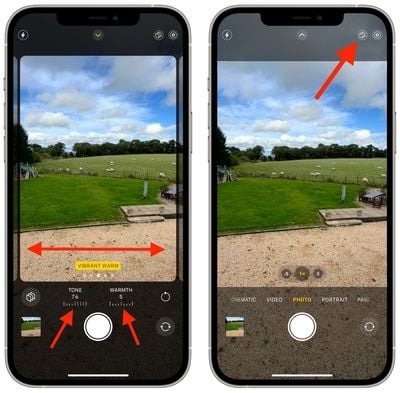
10. Turn on Photographic Styles for a Unique Photo Look
Apple added new smart filters to the iPhone 13, so you can change the overall look of your photos. These Photographic Styles are adjustable filters that can mute or boost colors in certain areas of an image without affecting skin tone.
Photographic Styles can be accessed right in the Camera app.
Open up the Camera app.
Select the standard Photo mode.
Tap on the little downward arrow at the top of the Camera app to get to the different camera settings.
Tap on the Photographic Styles icon, which looks like three squares in a row.
Swipe through the presets and select your favorite. You can see the results live in the Camera app.
Use the "Tone" and "Warmth" sliders to adjust the look until you get it to where you want.
Take the photo using the Shutter button.
The Photographic Style that you have set will remain active until you select another one or return back to the Standard style.
Learn More About iPhone 13
We have dedicated iPhone 13 and iPhone 13 Pro roundups that have a complete rundown of all of the features available in the iPhone 13, iPhone 13 mini, iPhone 13 Pro, and iPhone 13 Pro Max, and they're worth checking out if you're still getting to know your new iPhone.
We also have an iOS 15 roundup that's a great resource for getting familiar with everything the latest iPhones can do.
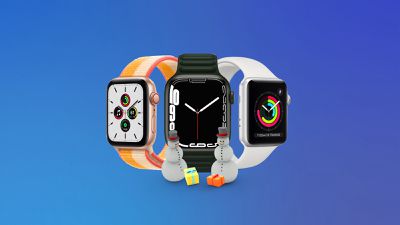
For MacRumors readers who just got a new Apple Watch for the holidays, we've created a list of 10 useful tips and tricks that you won't want to miss in order to get the most out of your new watch, whether you're new to Apple Watch entirely or upgrading from an earlier version.
Apple Watch Basics
New to the Apple Watch? We have some how-tos for beginners that will walk you through setup and basic features on your device so you don't miss out on anything.
Beyond the basics, here are 10 more useful tips about your new Apple Watch:
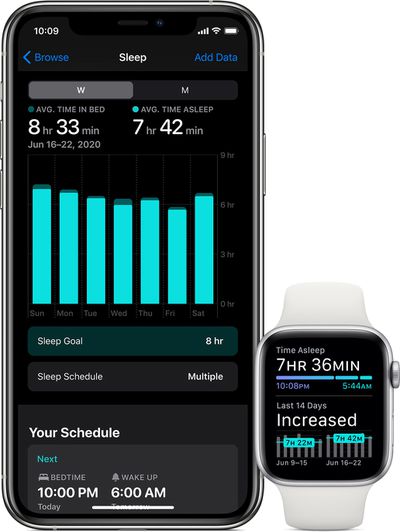
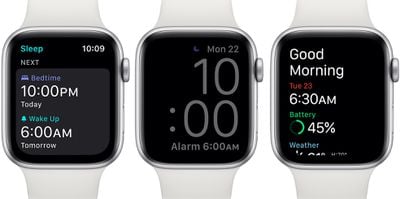
1. Track Your Sleep
If you wear your Apple Watch to bed, it will track the amount of time that you're asleep, providing insight into how long you're in bed, how much of that time you spend sleeping, and your heart rate.
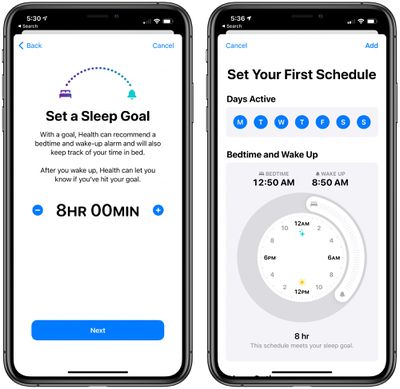
To have your Apple Watch automatically track your sleep when you go to bed, you need to set up Sleep Mode, which you can do in the Health app by following our tutorials.
With Sleep Mode, you tell your devices what time you want to go to sleep and what time you want to start winding down for bed. Sleep Mode will automatically silence your notifications at your Wind Down time, though you can customize who can contact you in Sleep Mode using the Focus interface.
When you wake up in the morning, Apple will provide you with a summary of the notifications that you received while you were sleeping, the weather for the day, and more.
Sleep data that's gathered by Apple Watch can be viewed in the Health app by going to the "Browse" tab and selecting "Sleep." It will provide information on your sleep trends, such as how well you slept one night compared to another night, and how consistent your sleep is from night to night.
Tip: Wearing your Apple Watch to bed has a benefit in addition to sleep tracking -- you can get woken up with a haptic alarm. The Apple Watch will gently tap you on the wrist until you wake up, which is useful if you sleep with a partner and want to wake quietly.
2. Unlock Your iPhone With Your Watch When Wearing a Mask
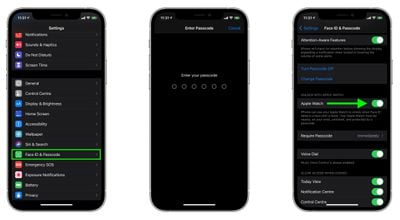
If you have both an iPhone with Face ID and an Apple Watch, you can enable a feature that will let you unlock your phone while wearing a mask using the Apple Watch as an extra authentication layer.
To use this feature, you need to make sure to enable it in the Settings app under "Face ID & Passcode," with specific instructions available in our how-to.
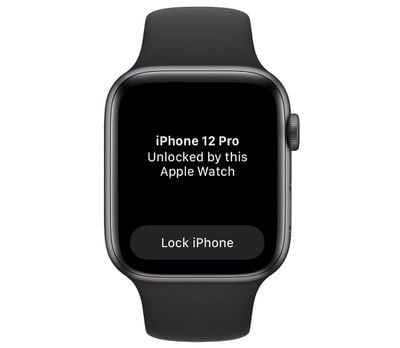
Once turned on, after you unlock your Apple Watch with an unlocked iPhone or your Apple Watch passcode, your Apple Watch will be able to unlock your iPhone through skin contact verification. When you're wearing a mask and swipe up to unlock your iPhone using Face ID, it will read your face and authenticate via the Apple Watch, successfully unlocking your device.
It's a method that's much quicker than having to enter a passcode whenever you have a mask on, and it's secure, too. Apple lets you know any time your watch unlocks the iPhone through a notification on your wrist, and the iPhone and Apple Watch need to be in close proximity to one another for the feature to work.
Tip: Unlocking the iPhone with an Apple Watch is based on a long-available feature that lets a Mac be enabled with an Apple Watch. If you haven't turned this on, it's super handy. Just go to System Preferences on your Mac, select "Security & Privacy," and enable "Use your Apple Watch to unlock apps and your Mac."
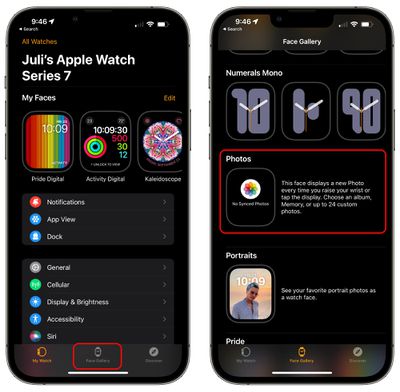
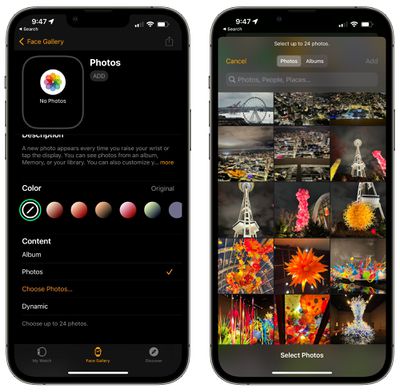
3. Set a Photo as Your Watch Face
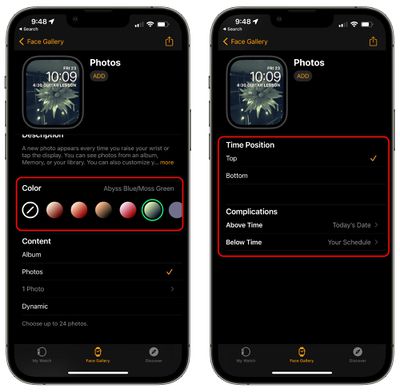
You can set one of your own photos as your watch face so you can glance down at your favorite places, people, or pets whenever you go to check the time. It's easiest to set a photo as a watch face on iPhone, following these instructions:
You can select an album of photos, such as your Favorites, or choose to select up to 24 individual photos from your Camera Roll. There's also an option for Dynamic, which uses photos from your Memories.
Tap on "Album" to choose an album, select "Choose Photos..." to choose photos, or tap on "Dynamic" to have it pull from Memories.
If you want to add a tint to your photos, pick a color from the top bar.
Scroll down to "Time Position" and choose "Top" or "Bottom," and then select your Complications if you want to use them.
Scroll back up to see a preview of your watch face, and tap "Add" if it looks good.
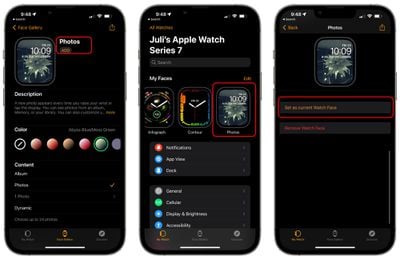
Tap on the "My Watch" tab.
Tap on the "Photos" watch face that you created.
Choose "Set as Current Watch Face."
Tip: In watchOS 8, Apple added a new "Portraits" watch face that accompanies the Photos face. With the Portraits face, you can choose a photo that you've captured using Portrait mode and set it as a watch face. With the data from the portrait photo, there is a sense of depth to the watch face, with the time able to be placed behind the subject in some images. To set it, follow the steps above, but choose Portraits instead of Photos at step 3.
Note that this effect only works with photos of people, and not pets or objects captured in Portrait mode.
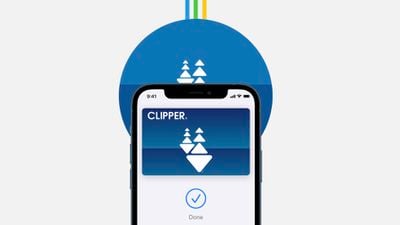
4. Set Up Express Transit
In select cities with robust transit options, there's a nifty Express Transit feature that lets you pass through a transaction gate with just a tap of your Apple Watch, with no need to wake your device or authenticate with a passcode.
Express Transit is super simple and convenient, whether you live in a city with the feature or are visiting. The feature can be set up through the Wallet app, and we have a how-to with full instructions. All you need is an iPhone and Apple Watch, and a debit or credit card linked to Apple Pay to pay for your fare.
In the United States, Express Transit is available in Chicago, Los Angeles, New York, Portland, the San Francisco Bay Area, and Washington D.C. It's also available in China, Hong Kong, Japan, Sweden, the UK, and more, with a full list available on Apple's website.
Express Transit is well worth setting up if you're in an area where it's accepted because of how quick and convenient it is. In New York, for example, if you want to get on the subway, you just tap your wrist on the turnstile and pass through. The charge goes onto your linked Apple Pay card with no other interaction from you. You don't even need a MetroCard.
In some cities like San Francisco, you do need to add a card to your Wallet app first, which can be done by opening up the Wallet app, tapping the "+" button, selecting "Transit Card" and choosing the card for the city that you're in. After this, you can still use the Express functionality that lets you tap and go without authenticating.
You can use Express Transit with either the iPhone or the Apple Watch, but as with Apple Pay, it's most convenient to use the Apple Watch as it's right on the wrist.
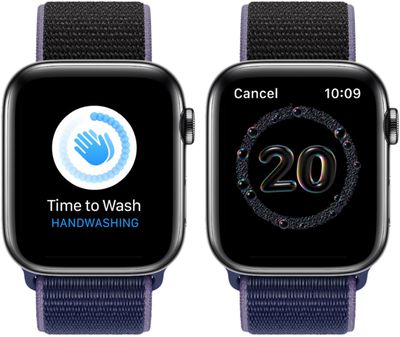
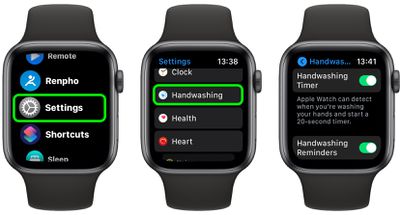
5. Time Your Handwashing
Washing your hands for an appropriate amount of time to eliminate viruses has been important in the ongoing global health crisis, and to make sure people are washing for a full 20 seconds, Apple added a Handwashing timer.
With this feature, the Apple Watch will detect when you're washing your hands based on the motion and the sound of running water, and it will start a 20 second countdown so you know how long to continue. Here's how to enable it:
Open up the Settings app on Apple Watch.
Swipe down or use the Digital Crown to scroll down to "Handwashing," and tap it.
Toggle on the "Handwashing Timer."
From there, the Apple Watch will detect when you're washing your hands. If you'd also like to receive a notification to remind you to wash your hands after returning home from an errand, you can also toggle on "Handwashing Reminders."
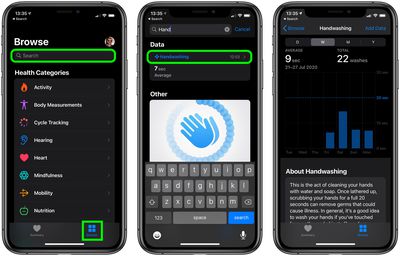
Tip: If you open up the Health app and search for "Handwashing," you can see statistics on how often you wash your hands and for how long.
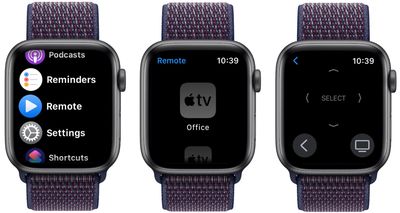
6. Control Your Apple TV With Your Watch
If you have an Apple TV set-top box, you can control it using the Remote app on your Apple Watch, which is useful if you lose your remote.
Press on the Digital Crown to get to your App List or App Grid, depending on your App View.
Find the "Remote" app, which is labeled as Remote and has a blue icon with a triangle in the center.
Tap it.
Wait a moment as the watch syncs to the Apple TV sets in your home.
Select the Apple TV you want to control.
From there, you can turn on the Apple TV by tapping on the little TV icon in the bottom left of the display, and scroll through the interface using swipe gestures. To launch an app or make a selection, just tap.
Tip: Tap on the "+" button to add an Apple TV that your watch is not linked to and go to Settings > General > Remotes on the Apple TV set. The Remote feature is compatible with the third-generation Apple TV and later.
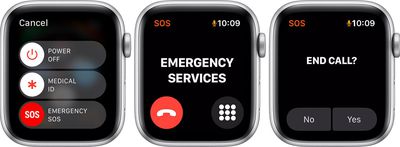
7. Get Help in an Emergency
If you want to be able to get help quick in an emergency, you can enable an SOS feature on the Apple Watch that calls emergency services with the press of a button.
Open up the Settings app on the Apple Watch.
Scroll down to "SOS."
Enable "Hold Side Button."
With the SOS feature toggled on, your Apple Watch will begin dialing emergency services in the country where you're located if you hold down the side button. The side button is the rounded rectangular button below the Digital Crown.
Holding it down calls emergency services, but you will have a countdown to stop the call in case it gets activated by accident.
Tip: If you want the Apple Watch to be able to automatically call emergency services if you take a hard fall, enable fall detection in this same section. If you slip and are knocked unconscious or have an accident on a bike, skateboard, or other mode of transportation, your Apple Watch can get you help.
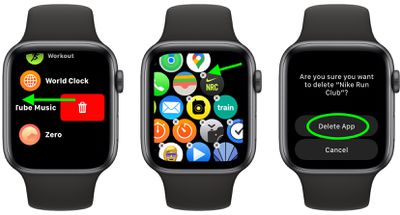
8. Remove Apps From Your Apple Watch
If you have a bunch of apps on your Apple Watch that you don't need, you can get rid of them.
Unlock your Apple Watch and go to the App View.
Long press on the Apple Watch display.
Tap on "Edit Apps."
Scroll through the list or swipe through the grid (depending on your view choice) to locate apps you don't want.
Tap on the small "x" on the app to delete an app or swipe to get to the delete interface if you use the List view.
Confirm that you want to delete the app.
Note that there are core apps that cannot be removed from the Apple Watch like Activity, Compass, App Store, Heart Rate, Maps, Mail, and Messages, but there are a number that can be eliminated for a cleaner look.
You can remove Alarms, ECG, Blood Oxygen, Memoji, Find Items, Cycle Tracking, Mindfulness, Sleep, and other similar apps. If you want them back later after deleting them, you will need to redownload them from the App Store.
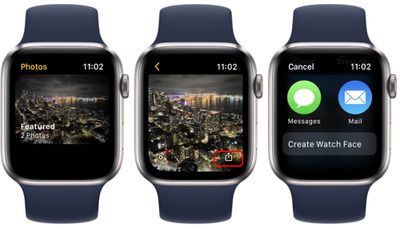
9. Share a Photo From Your Watch
As of watchOS 8, Apple is allowing users to share photos directly from their Apple Watches. If you come across an image on your watch that you want to share, you can send it to someone else right from your wrist.
Open up the Photos app on the Apple Watch.
Select a photo that you want to share and tap it.
Tap on the small share icon on the bottom right of the photo.
Apple will offer your most recent contacts to send it to, or you can scroll down and send it to anyone using Messages or Mail.
Select a contact, and then write a message if you want to add one.
Tip: The Photos app on Apple Watch can display one album from your iPhone photos. To change it, open up the Watch app on iPhone, scroll down and select Photos, and tap on "Sync Album" to choose an album to sync to your Apple Watch.
You can sync up to 500 photos, but be aware that the number of photos that you choose affects the storage space on your Apple Watch. In the Watch app under Photos, you can also choose to sync memories and sync featured photos. With these options enabled, your featured memories and images will show up in the Photos app, and the selection will change daily.
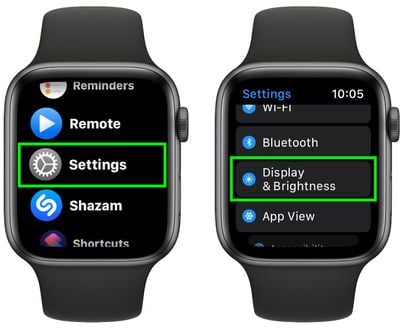
10. Make Apple Watch Text Larger
Apple Watch text can be tiny, especially on the smaller 40 and 41mm Apple Watch models. You can make it bigger by following these steps:
Open up the Settings app on Apple Watch.
Scroll down to "Display & Brightness" and tap it.
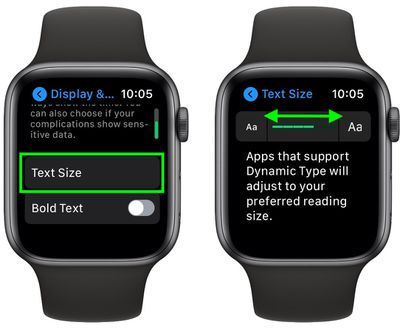
Tap on "Text Size."
Tap on the "Aa" on the right side of the display to make the text bigger, and tap on the "Aa" icon on the left side to make it smaller again.
When you adjust the text size, any app that supports Dynamic Type will show your preferred text size. If you want to make text even more visible, toggle on the "Bold Text" option below text size.
Learn More About Your Watch
We have dedicated roundups for the Apple Watch Series 7 and the Apple Watch SE, both of which provide a complete overview of the different features available with each model. Our watchOS 8 roundup also offers a good look at the newest features introduced to the Apple Watch through software.
It's just after the December holidays, and many people may have received an iPad as a gift. If that's you and you're new to the iPad or this is your first update in some time, make sure to check out the tips below to get the most out of your tablet, whether it's an iPad mini, iPad, iPad Air, or iPad Pro.
Basic Tips for Beginners
If you're brand new to the iPad, we have some basic articles that will walk you through the fundamentals you need to know to get started with your iPad.
Beyond the basics, here are 10 more useful tips about your new iPad:
10 Things to Know About Your New iPad
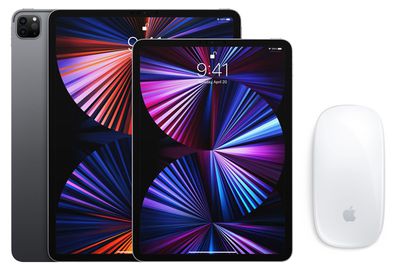
1. Use a Mouse and Keyboard With Your iPad
If you want to turn your iPad into a replacement for a Mac when you're working at a desk, you can do so with a mouse and a keyboard.
As with a Mac, you can connect any Bluetooth mouse, keyboard, or trackpad to your iPad to use those inputs as an alternative to the touch screen. It's really as simple as opening up Bluetooth and initiating the pairing process, but we've got some handy how tos that cover all the ins and outs of using a keyboard and a mouse with an iPad.
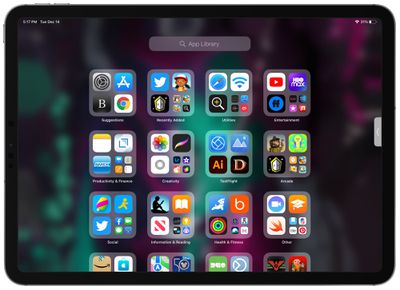
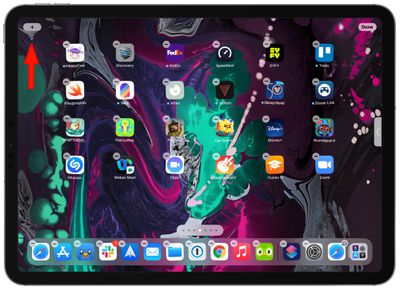
Have an iPad Home Screen that's cluttered up with all manner of apps? As of iPadOS 15, the App Library is available on the iPad, which means you have instant access to a well-organized list of all the apps on your iPad.
To get to it, just swipe all the way over to the end of your Home Screen pages. App Library automatically organizes your apps into categories like Games, Entertainment, Health & Fitness, Social, and more.
You can scroll through the categories and tap into each one to see all the apps listed there, or you can take advantage of the search feature.
Tip: If you want to delete your Home Screen pages in bulk or rearrange them, just long press on an empty area of the Home Screen and then tap on the row of dots at the bottom of the display. You can drag Home Screen pages to rearrange, or tap on the checkmark and then the "-" to delete them.
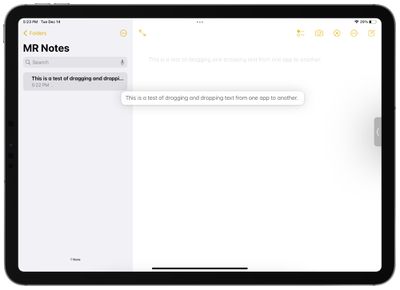
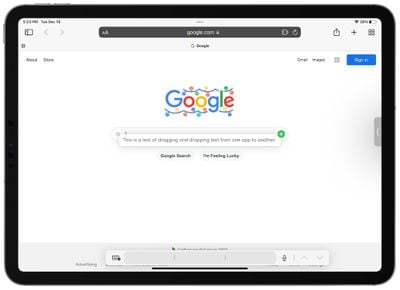
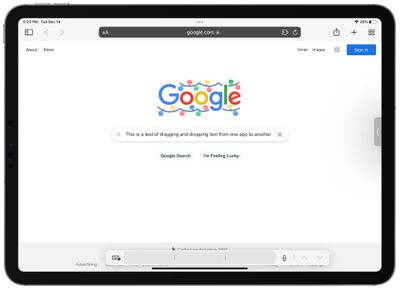
3. Drag and Drop Text Between Apps
If you want to move text from one app to another on the iPad, such as pasting some text from Safari into Notes, you can do so with a drag-and-drop gesture.
Select the text that you want to move from one app to another by long pressing. Drag the two little bars to get exactly the text you want.
On the highlighted text, press and hold to pull it up from the page.
Keep your finger on the text while you use another finger or your other hand to open up the app you want to move the text to.
When the text is situated in the app where you want it to go, release your finger and it will be pasted over.
Tip: This drag-and-drop text gesture is easiest to use in multitasking mode, where you have two app windows open side by side.
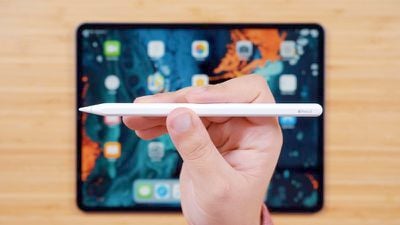
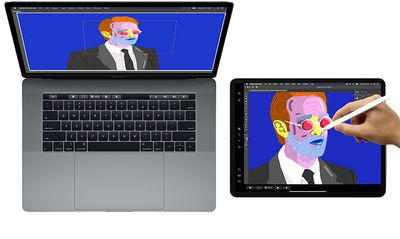
4. Use an Apple Pencil
An Apple Pencil is hands down one of the best accessories that you can get to use with an iPad, and all of Apple's modern iPads support one of the two Apple Pencil models. If you didn't get an Apple Pencil gifted with your iPad, it's well worth considering.
With an Apple Pencil, you can sketch and draw within drawing apps, note-taking apps, and more, but you can also navigate with the Apple Pencil and you can write in any text field on the iPad, with the iPad translating it into typed text.
In the built-in Notes app, for example, you can open it up and just start writing with the Pencil. The same goes for Safari searches, Calendar events, Messages, and so much more.
There are two different versions of the Apple Pencil, so the model you need will depend on which iPad you have. To determine your iPad model, open up the Settings app, tap on "General" and then tap on "About." Your model is listed under "Model name."
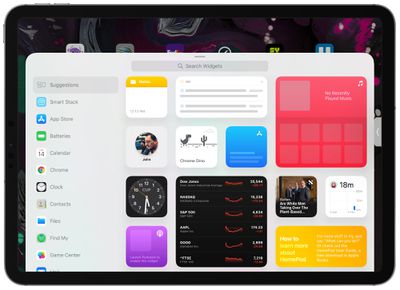
Many of Apple's apps and third-party apps come with widgets, which you can put on your Home Screen or view in the Today Center to get information at a glance.
Here's how to add a widget to your Home Screen:
Long press on an empty space on the Home Screen to enter "Jiggle" mode where the icons are wiggling.
Tap on the "+" button in the upper left hand corner of the display.
Scroll through the widget suggestions, or search for a specific widget.
Tap on the widget you want, and then swipe through the the different options. For many widgets, you can choose a size, and for others, you can customize the function.
When you've customized your widget to your satisfaction, tap "Add Widget."
It will be placed on the Home Screen, and from there, you can drag it into the position that you want.
Tap "Done" when you're finished.
Tip: On the iPad, you have access to XL widgets, a larger-sized widget that's not available on the iPhone. You can also add widgets to the Today View by going to your first Home Screen page and then swiping again from left or right to open the Today View interface.
Add a widget by long pressing on the display and then tapping the "+" button as outlined above. You can drag and drop widgets to rearrange them, or pull one out from Today View to your Home Screen.
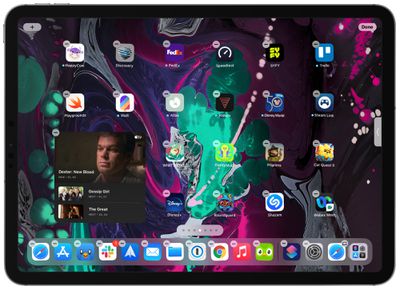
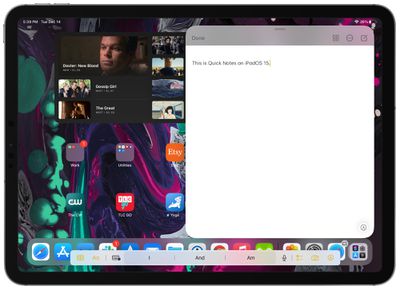
6. Use Quick Notes
With iOS 15, Apple added a handy Quick Notes feature to the iPad that's designed for jotting down notes without having to open up the Notes app. Quick Notes can be used with or without an Apple Pencil, and the interface can be accessed at any time with a simple gesture.
In any app, or on the Home Screen, swipe up diagonally from the right hand corner of the screen.
You can do the diagonal swipe in either portrait or landscape mode – it works the same.
Type your notes or write with the Apple Pencil.
Swipe to collapse the Quick Note to the side if you want to hide it temporarily and bring it back to look something up.
Tap "Done" when you're finished.
Tip: You can also get to Quick Notes through the Control Center by tapping on the Notes icon, or by using the Globe key + Q keyboard shortcut. If you have an Apple Pencil, you can also tap it on the iPad's locked screen to bring up a note.
If you have a Mac and it's not too old, you can use your iPad as a second screen with Apple's Sidecar feature.
Using Sidecar is as simple as accessing the display section of the Control Center on your Mac and beaming your screen to your iPad, but we have a detailed guide with full instructions below.
Your iPad needs to be compatible with an Apple Pencil and it needs to be running iPadOS 13 or later. That includes the iPad mini 5 or newer, all iPad Pro models, the sixth-generation iPad or newer, and the third-generation iPad Air or newer.
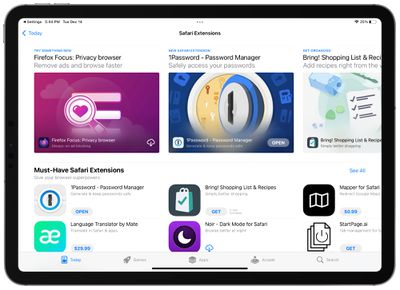
8. Enhance Safari With Extensions
Safari on the iPad supports all of the same extensions that you might get on your Mac, so you can download extensions for turning all webpages to dark mode, using password managers, avoiding AMP pages, and more.
Getting Safari Extensions is as simple as opening up the Settings app, scrolling down to Safari, tapping on Extensions, and then selecting More Extensions to get to the Extensions section in the App Store.
We have a detailed walkthrough on installing extensions and a handy guide on some useful extensions that are worth checking out.
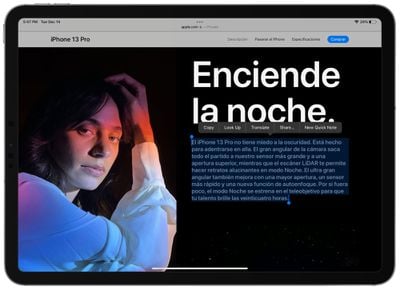
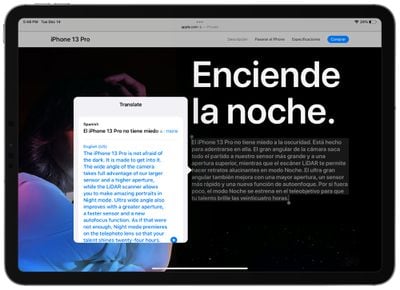
With iOS and iPadOS 15, Apple introduced system-wide translation, so you can select text anywhere on the iPad and get a translation as long as you have an internet connection.
Select the text that you want to have translated by long pressing and then dragging the blue bars.
Tap on the selected text.
On the bar that pops up, tap on the "Translate" option.
The text will be translated in a small window to the side.
You can translate content in the Notes app, Safari, Messages, or any other app where you can select text on the iPad. With Live Text, a feature that recognizes all of the text in photos, you can also take a photo of text in a foreign language and translate that.
System-wide translation works for Arabic, Mandarin Chinese, English, French, German, Italian, Japanese, Korean, Portuguese, Russian, and Spanish.
10. Find Anything With Spotlight
If you don't already use Spotlight on your iPad, it's the best way to find just about anything. To get to it, just go to the Home Screen and swipe down.
In addition to Siri Suggestions, which offers up apps you might want to access based on your usage history, there will be a search bar. Tap into it and you can search for all manner of things. Just some of what you can use Spotlight for:
Finding and launching apps you have installed
Finding new apps in the App Store
Rearranging apps (search for an app and then drag it out of Spotlight to the Home Screen)
Installing apps (after a search, tap on "Get")
Deleting apps (long press and choose delete)
Looking for photos (search by date, person, or object in the photo)
Facts about actors, actresses, and other well-known people
Information on contacts
Web images (search for [subject] images)
Converting measurements
Converting currency
Simple calculations
Find content in Notes, Messages, and other apps
Tip: If you swipe down from the Lock Screen on your iPad, you can get to a Spotlight Search interface without having to unlock your device.
If you want to see more on Spotlight Search and how it can be used, we have a dedicated guide highlighting all of the new features that came in iOS 15.
Learn More About Your iPad
We have dedicated roundups for each of Apple's iPads, with complete feature rundowns.
You'll also want to take a look at the iPadOS 15 roundup to learn how to use all of the iPad functions that were introduced with this year's software update.
Just get a new set of AirPods for Christmas? If so, we've rounded up a handy list of tips, tricks, and features that you might not know about to get you acquainted with your new earbuds.
First, if you are new to AirPods entirely, we have a long list of basic tips on how to use your AirPods.
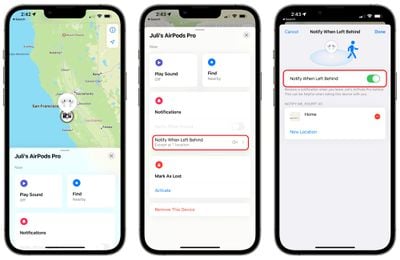
Apple's latest AirPods, including the AirPods 3 and AirPods Pro, feature Find My integration, so if they're stolen or misplaced, you can locate them with the Find My app. AirPods can take advantage of the Find My network so you can leverage the iPhones, iPads, and Macs of other people to track down a lost set of AirPods wherever they end up, so long as the battery holds out.
You'll also want to make sure you turn on "Notify When Left Behind" so you can get alerted right away if you're out and about and forget your AirPods somewhere. To turn it on, open up the Find My app, tap on your AirPods in the list, and toggle on the "Notify When Left Behind" option. These Find My features also work for the AirPods Max.
2. Activate or Deactivate Automatic Device Switching
Apple's AirPods have a feature that allows them to automatically connect to whatever device is in active use, so if you swap from your iPhone to your Mac, the AirPods connection is meant to transition from one device to another as you do.
Automatic Switching can be useful, but there are instances where you might not want it turned on if it's switching between devices inappropriately. You can manage it by following these steps:
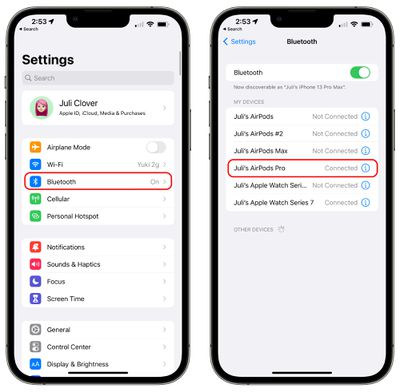
Connect your AirPods to your iPhone.
Open up the Settings app.
Tap on Bluetooth and then select the "i" next to your AirPods in the list.
Tap on "Connect to This iPhone."
Choose "When Last Connected to This iPhone" to turn automatic switching off, and choose "Automatically" to turn it on.
With "Automatically" turned on, your AirPods will connect to your iPhone when it's in active use and your AirPods are in your ears. With "When Last Connected to This iPhone" selected, AirPods will only connect to the last connected device rather than the device in active use. This feature also works with AirPods 2, AirPods 3, AirPods Pro, and AirPods Max.
Note that you will need to disable Automatic Switching for each device connected to your iCloud account if you're not a fan of the feature and want it off entirely. There's no master toggle, with Apple handling it on a per-device basis.
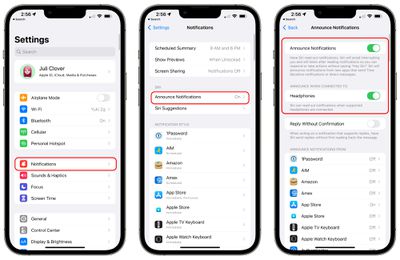
With both Announce Notifications and Headphones toggled on, Siri will read out notifications from apps of your choice when you have the AirPods in, and will give you an opportunity to respond. So if you have an incoming text message, Siri will read it out and give you a chance to send out a reply, all hands-free.
You can select the apps that you want to use Announce Notifications with so you can get important readouts without having a deluge of notifications read to you by Siri.
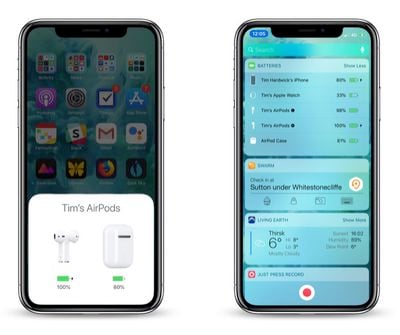
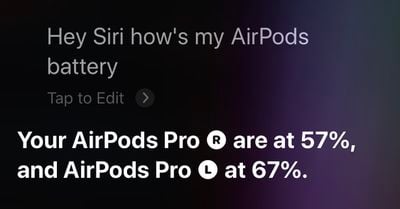
4. Check Your AirPods Battery Life
If you want to keep tabs on your AirPods battery life, there are multiple ways to do so. AirPods will tell you battery level when you connect them to a device, or you can use the "Battery" widget on an iPhone or an iPad.
Siri is also able to tell you your AirPods battery life, and if your AirPods are connected to your Apple Watch, the control center offers battery life information. For more on the different ways to check your AirPods battery life, we have a dedicated AirPods battery how-to.
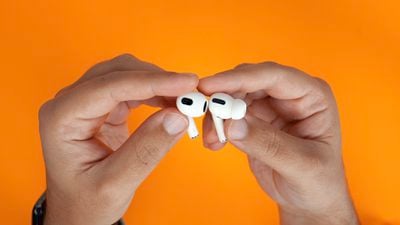
5. Use the Force Sensor to Control Playback
If you've upgraded to the AirPods 3 or AirPods Pro from the original AirPods or the AirPods 2, or if you're new to AirPods entirely, you might not be familiar with the physical controls.
The AirPods 3 and AirPods Pro have a built-in force sensor in the stem. The force sensor can be used for controlling media playback with different presses.
Single press - Play/Pause audio
Double press - Skip forward
Triple press - Skip backward
Press when there's a call - Answer incoming call
Double press on a call - Hang up
Press and hold - Activate Siri
On AirPods Pro, you can customize what the long press force sensor gesture does because it can be set to Noise Control or Siri. The AirPods 3 do not have Active Noise Cancellation and are limited to Siri for the press-and-hold gesture.
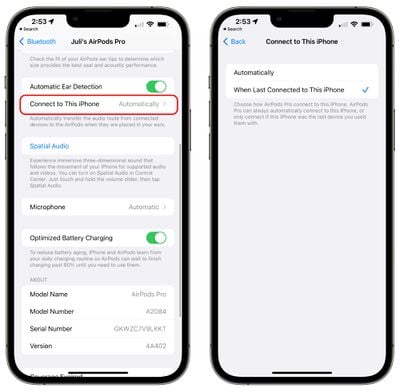
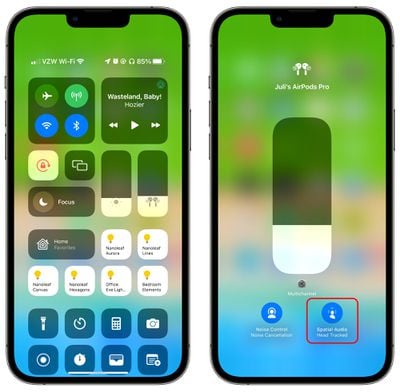
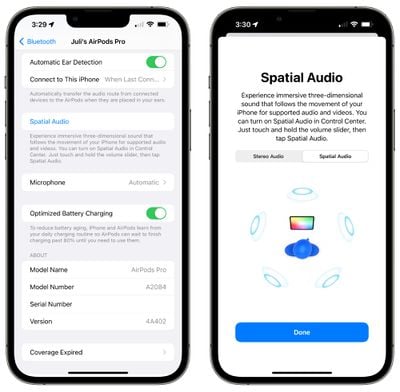
6. Make Sure Spatial Audio is Activated
Spatial audio is a feature that offers immersive three-dimensional sound, and it is able to follow the movement of the iPhone with supported audio and video. Spatial audio can be toggled on or off using the Control Center, and it is available for AirPods 3, AirPods Pro, and AirPods Max.
With your AirPods connected to your iPhone or iPad, open up the Control Center. If you don't know how, we have a guide.
On the volume slider, you should see a little icon that looks like the AirPods. If you don't see it, reconnect your AirPods.
Long press on the volume slider.
Tap on the "Spatial Audio" option.
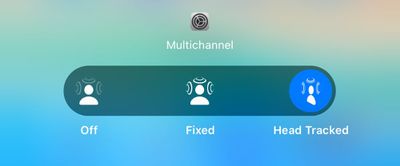
Choose between Off, Fixed, or Head Tracked (on supported devices).
Off will turn spatial audio off entirely, while Fixed will allow spatial audio to be used, but without head-tracking functionality. Head Tracked enables the full spatial audio feature with head tracking included.
You can also preview what spatial audio sounds like by connecting your AirPods to your phone, selecting them in the Bluetooth section of the Settings app, and choosing the "Spatial Audio" option.
Spatial audio works with the Apple TV app and Apple Music, but many third party apps also support it like Netflix, Disney+, HBO Max, YouTube, and more. We have a useful guide that outlines many popular third-party apps that support spatial audio.
iPhone 15 Pro models may lack a physical SIM card slot, according to a sketchy rumor shared by Brazilian website Blog do iPhone.
Image Credit: iFixit
While recent iPhone models have a physical nano-SIM card slot and a digital eSIM, the report claims that iPhone 15 Pro models slated for release in 2023 will instead have two eSIMs, ensuring that Dual-SIM functionality remains available. Dual-SIM mode allows you to have two lines of service on one iPhone, which is useful for purchasing data-only plans while traveling abroad or having personal and business lines on a single iPhone.
Given that iPhone 15 Pro models are still two years away from being released, this rumor should be treated with some skepticism until it is corroborated by other sources. Blog do iPhone is also not a well-established source of Apple rumors.
If this rumor proves to be accurate, iPhone 15 Pro models might still have a physical SIM card slot in countries where eSIM service is not available.
The removal of the SIM card slot could further improve water resistance. Apple is also rumored to release a portless iPhone without a Lightning connector in the future, and the lack of a SIM card slot would be another step towards a truly seamless design.
Apple must let dating apps like Tinder and Match offer payment methods other than Apple's in-app purchase system in the App Store in the Netherlands, or else it will face fines, the Dutch competition regulator announced today.
Specifically, the Authority for Consumers and Markets (ACM) said Apple will have to pay a penalty of five million euros per week, up to a maximum of 50 million euros, if it does not comply with the order within two months. The deadline comes a few months after the ACM ruled the App Store's in-app commission structure was unreasonable.
"Some app providers are dependent on Apple's App Store, and Apple takes advantage of that dependency," said ACM chairman Martijn Snoep. "Apple has special responsibilities because of its dominant position. That is why Apple needs to take seriously the interests of app providers too, and set reasonable conditions."
The ACM has been investigating Apple since 2019, and while the probe started out as a look into whether Apple's App Store practices were an abuse of dominant market position, it was later scaled back to focus on dating apps.
The ACM has shared a PDF summary of its decision with more details, and MacRumors has reached out to Apple for comment on the matter.
Note: Due to the political or social nature of the discussion regarding this topic, the discussion thread is located in our Political News forum. All forum members and site visitors are welcome to read and follow the thread, but posting is limited to forum members with at least 100 posts.
Spotify and Slack weren't even a thing 22 years ago, but driven by curiosity and an interest in the evolution of user interfaces, graphic designer Michael Feeney has painstakingly reimagined them and other macOS 12 applications to see what they would have looked like in the Mac OS 9 era.
In order to realize "(mac)OStalgia," Feeney first went back and analyzed the Mac OS 9 environment using the SheepShaver emulator, and then created a library of UI components that he could reuse throughout the project.
He then took a number of apps crucial to his daily workflow, including Spotify, Slack, Zoom, Figma, TextEdit, and Google Chrome, and gave their UIs the Mac OS 9 treatment. The results of Feeney's project are impressive, as you can see in the embedded video below.
As for what stood out the most in terms of the differences between the user interface and user experience, Feeney says:
Even though Design and UI trends definitely changed a lot in the past 20 years, applications still behave and look (somehow, aesthetic aside) very similar. After all, it is indeed difficult to replace well installed behaviour such as visual feedback on hover, scroll for more content, double click to launch application, etc. Basically, because our Operating Systems still behave in a similar way, so did the UI and the UX of many of our apps. One area where both UI and UX improved dramatically as part of the operating systems is on the accessibility front. The apparition (and improvement) of a full-fledged Voice Control, integrated screen readers, dark mode, etc. is definitely what stood out the most looking back at Mac OS 9.
Mac OS 9 was introduced on October 23, 1999, and featured internet support out of the box with Internet Explorer, an email client, text-to-speech, and Sherlock 2.0 – the built-in tool that let users search their computer and the internet, and the direct ancestor of Spotlight in macOS. Apple discontinued development of Mac OS 9 in 2001 and it was succeeded by Mac OS X.
Feeney's Mac OS 9: UI Kit is available to download for free, for use by the Figma community and in personal projects as well.
If you have been good this year, you may be interested to know that Google today launched its annual Santa tracking feature, allowing Santa to be tracked in real time on his mythical journey to the North Pole as he prepares to deliver presents to kids around the world.
Google's Santa Tracker continues an 18-year tradition for the company, allowing excited children (and parents!) to keep up with the jolly gift-giver's travels throughout December 24. On this day, Santa's Village transforms into a tracking experience where children can follow Santa and his reindeer as they go about their merry work.
Santa can be tracked using a web browser on iPhone, iPad, or Mac by visiting Google's official Santa Tracking website. The site features a live map of Santa's current location, his next stop, a live video feed of his journey, and the estimated time that he will arrive in each specific location.
The Santa site provides pictures of locations that Santa has already visited, a live count of gifts that have been delivered, and Santa's current distance from your location. There are also a selection of games to play, creative things to do, and videos to watch.
Other Santa tracking services are also available, such as the NORAD Tracks Santa Claus app and website, but Google's site is often the most interactive and detailed.
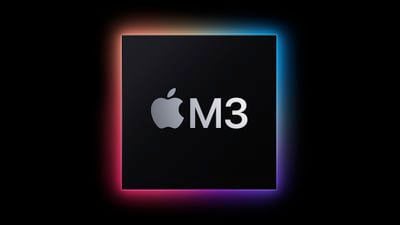
TSMC plans to begin commercial production of chips built on its 3nm process in the fourth quarter of 2022, according to industry sources cited by DigiTimes. The full report has yet to be published, so no additional details are available at this time.
Apple is expected to release its first devices with 3nm chips fabricated by TSMC in 2023, including Macs with M3 chips and iPhone 15 models with A17 chips. As usual, the move to a more advanced process will result in improved performance and power efficiency, which will enable faster speeds and longer battery life on future Macs and iPhones.
The Information's Wayne Ma last month reported that some M3 chips will have up to four dies, which he said could allow for up to a 40-core CPU. By comparison, the M1 chip has an 8-core CPU and the M1 Pro and M1 Max chips have 10-core CPUs.
M1 Macs already offer industry-leading performance-per-watt, while the A15 chip in iPhone 13 models is the fastest processor ever in a smartphone, so the move to a 3nm process within a few years should only bolster Apple's lead in this area.
Amazon this week introduced a new record low price on the Apple Watch Series 7, dropping the 41mm GPS Green Aluminum model with a Clover Sport Band to $339.00, down from $399.00. At $60 off, this is the lowest price we've seen yet on the new Apple Watch Series 7, and if you order soon and pay for next-day shipping, it'll arrive in time for Christmas.
Note: MacRumors is an affiliate partner with some of these vendors. When you click a link and make a purchase, we may receive a small payment, which helps us keep the site running.
Next year's iPhone 14 Pro and iPhone 14 Pro Max will feature hole-punched LTPO OLED display panels supplied by Samsung and LG, according to Korean site The Elec.
Rumors that the 2022 iPhone models won't have a notch started in March of this year, when Apple analyst Ming-Chi Kuo said they will instead adopt a hole-punch design, a design that Android devices have used for a few years now. The hole-punch is a center-placed cutout for the front-facing camera that allows for a larger display area in lieu of a notch.
Kuo believes that at a minimum, the high-end iPhone models will have the hole-punch design, though if yields are good, all iPhone models coming in 2022 could feature the same notchless design.
More recent rumors have suggested the non-Pro iPhone 14 models, which will measure in at 6.1 and 6.7 inches, will continue to have a notch, with Apple limiting the hole-punch design to the more expensive iPhones. There will not be an "iPhone 14 mini," with this year's iteration of the smaller device being the last, according to reports.
According to the latest report from The Elec, Samsung, Apple's dominant OLED panel supplier, will supply all of the hole-punched panels for the 6.1-inch iPhone 14 Pro, while sharing orders for the 6.7-inch iPhone 14 Pro Max with LG Display for the first time.
Samsung supplied the notched LTPO TFT OLED panels used in both Pro models in this year's iPhone 13 series, but LG Display didn't win any panel orders for iPhone 13, although it did take part in the development of the panels with Apple.
Winning some orders for the iPhone 14 Pro Max is therefore a big boost to LG as it seeks to get a foot in the door of Apple's iPhone supply chain. Meanwhile, it allows Apple to reduce its reliance on Samsung as well as get leverage in price negotiations.
With no notch, Apple will a implement a different solution for Face ID, and rumors suggest that it could be placed under the display. For everything we know about the iPhone 14, check out our dedicated guide.
A number of Apple Watch Series 7 owners have been experiencing issues with charging after updating to the latest watchOS 8.3 software, according to reports on the MacRumors forums, Reddit, and the Apple Support Communities.
Many of the complaints are related to third-party Apple Watch chargers, with users finding that these devices no longer work to charge their Apple Watches. From Reddit:
Updated my watch last night to 8.3, set it on my 3rd party charger this morning, came back after an hour and it had gained maybe 2%?
Tried the same thing with my spouse's watch and her 3rd party charger with the same result.
Put them on the official charger, zoom, done charging in no time. Argh!
There are reports about multiple third-party chargers, and it seems to be a widespread problem affecting several different models rather than an issue with a few select chargers. Many of the complaints are about the affordable third-party chargers that come from Amazon, and there are fewer reports about brands like Belkin being non-functional.
In many cases, the Apple Watch will charge for a few minutes, and then charging will suddenly stop. Restarting the Apple Watch can help jump start charging, but it does not appear to be a permanent solution for most people, with the charging issues recurring.
A smaller number of users are also having issues charging with Apple-supplied Apple Watch charging pucks, and still others are seeing very slow charging speeds or the Apple Watch battery draining while on the charger. From the MacRumors forums:
Charging problems are more often with watchOS 8.3. It has become ridiculous, it charges around 2% in 10 minutes. What is this? The new ultra slow charging exclusively for Watch Series 7 or what.
This is everything but not the advertised fast charging.
There have been complaints about Apple Watch Series 7 charging issues since early November, and Apple initially addressed a problem that was causing slow charging speeds in the watchOS 8.1.1 update.
Some users continued to see issues even after that November watchOS 8.1.1 update, and the watchOS 8.3 update appears to have introduced issues for even more Apple Watch owners. It is not clear if Apple has a fix in the works for the issues that users are experiencing after the watchOS 8.3 update, but it is likely that the problem will be addressed in a future update.
Most of the affected models are Apple Watch Series 7 devices, but there have also been a handful of charging complaints from Apple Watch Series 6 owners.
Apple Maps Product Lead David Dorn and Design Lead Meg Frost recently did an interview with CNN to explain the Apple Maps features that were introduced with the iOS 15 update and to explain why iPhone users should choose Apple Maps over other mapping apps like Google and Waze.
According to Dorn, there are three major reasons why Apple Maps is the best choice.
Apple is making serious investments into Maps to improve it.
Privacy is central and Apple isn't tracking your location for data purposes when you use Apple Maps.
Maps is part of the Apple ecosystem and integrates well with other Apple devices and services.
Apple's effort into improving the Maps app can be seen in iOS 15, an update that added new 3D city details in select areas like London, New York, Los Angeles, and the San Francisco Bay Area. There are also navigation updates that add more detail at complex interchanges. Frost said that Apple wanted to make maps "both safer and visually satisfying to navigate."
As for the 3D landmarks added in the update, each landmark is created by hand. "We pick the amount of detail we find appropriate and create a 3D mesh of the building landmark itself. And we apply it to the base map," Frost told CNN.
The full Apple Maps interview can be read over on CNN's website, and it provides more detail on features like Share ETA, CarPlay, real-time AR walking directions, and more.
Apple today shared a new video on YouTube demonstrating 10 helpful iPhone tips and tricks that some users may not have known about.
An overview of each of the 10 tips and tricks:
If you accidentally enter a wrong digit in the Calculator app, you can swipe left or right at the top of the screen to erase the digit.
Starting with iOS 15, you can pin content like web links in a Messages conversation by touching and holding the item you want to pin and tapping Pin.
To stack Home screen widgets, touch and hold an empty space on the Home screen and then drag one widget onto another of the same size.
To select multiple photos to add to other apps, touch and hold a photo until you feel a tap, drag the photo to another part of the screen while still holding it, tap additional photos with a different finger to create a stack, switch to another app while still holding the stack, and lift your finger.
To create a text replacement such as "omw" for "on my way," open the Settings app and tap General > Keyboard > Text Replacement.
To open the Camera app without unlocking your iPhone, swipe left on the Lock screen.
To scan a document in the Notes app, tap the camera button in a note, tap Scan Documents, and position the document in the viewfinder.
Starting with iOS 15, you can copy and paste real-world text in the Camera app by holding the viewfinder over a document or sign, tapping the Scan Text button in the bottom-right corner, and tapping Copy.
To jump to the first photo in an album in the Photos app, tap the very top of the screen.
To quickly access Search and Siri Suggestions from the Home screen, swipe down on the middle of the screen.
This week marks the 25th anniversary of Apple announcing that it had agreed to acquire NeXT for $400 million. The stunning move brought Steve Jobs back to Apple over a decade after he left the company following an internal power struggle.
"The acquisition of NeXT is the start of a new chapter in Apple's history and represents a milestone in our transformation as a corporation," said former Apple CEO Gil Amelio, when the deal was announced December 20, 1996. "Today Apple welcomed back its most talented visionary Steve Jobs, someone who can inspire a new generation of customers and software developers and show that Apple remains the industry home for innovation and excitement."
A key reason Apple acquired NeXT was to gain access to its Unix-based NeXTSTEP operating system, which served as the foundation of Mac OS X.
"With this merger, the advanced software from NeXT will be married with Apple's very high-volume hardware platforms and marketing channels to create another breakthrough, leapfrogging existing platforms, and fueling Apple and the industry copy cats for the next ten years and beyond," said Jobs. "I still have very deep feelings for Apple, and it gives me great joy to play a role in architecting Apple's future."
Jobs initially returned to Apple as an advisor, making his first appearance at Macworld San Francisco in January 1997 to announce details of how Apple planned to incorporate NeXT technology into future releases of Mac OS. Jobs went on to replace Amelio as the company's interim CEO just nine months later, and he ended up dropping the interim title and remaining CEO until stepping down in August 2011 due to health issues.
Under the leadership of Jobs, Apple went from near bankruptcy to becoming the world's most valuable company, introducing iconic products like the iPod, iPhone, and iPad along the way. Without acquiring NeXT, Apple's fate may have been far different.
Steve Hayman, a longtime Apple and NeXT employee, reflected on the 25th anniversary of the two companies merging in a blog post earlier this week.
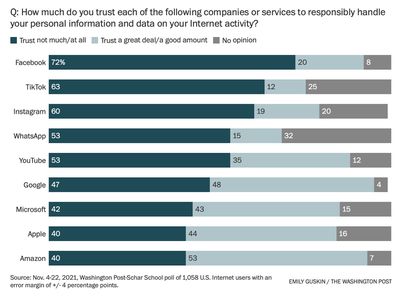
According to a new survey, more users trust Amazon and Google to handle their personal user data and internet browsing activity than Apple, while users overwhelmingly distrust Facebook, TikTok, and Instagram.
The survey conducted by The Washington Post sampled over 1,000 internet users in the U.S. about how much they trust Facebook, TikTok, Instagram, WhatsApp, YouTube, Google, Microsoft, Apple, and Amazon to "responsibly" handle their user data and browsing activity.
Users were polled on whether they trust the companies and platforms "a great deal," "a good amount," "not much," or "not at all," with users also able to state they had no opinion of a given company.
Among respondents, 18% said they trust Apple "a great deal," while Google and Amazon scored 14%. But in the "a good amount" category, Amazon took the lead with 39%, Google with 34%, and Apple trailing with 26%. Combining the two positive categories, Apple's overall net positive score was 44%, lagging behind Google's 48% and Amazon's 53%.
On the negative side, survey data indicated that out of Amazon, Apple, Google, and Microsoft, 40% of those surveyed said they don't trust Facebook at all to handle their user data. Facebook took the crown for being the least trustworthy out of all those listed. A separate survey last week revealed a similar sentiment amongst users, naming Facebook, now known as Meta, as the worst company of 2021.
Apple tied Amazon for the best net negative score at 40%, with Microsoft coming in at 42% and Google at 47%.
Internet users were also asked about targeted online advertising, with 82% saying they find targeted online ads annoying, 74% finding them invasive, and only 27% finding them helpful. One of Apple's most controversial and talked-about privacy measures introduced in recent years is App Tracking Transparency, which indirectly aims to limit the annoying and invasive ads seemingly disliked by most users.
App Tracking Transparency (ATT) requires apps to ask for users' consent before tracking them across other apps and websites. For users opted out of the tracking, apps and data brokers such as Facebook have fewer data points to show users targeted advertising online. Facebook has lobbied against ATT, calling it harmful to small businesses that rely on ads to keep afloat.
Biggest design overhaul since iOS 7 with Liquid Glass, plus new Apple Intelligence features and improvements to Messages, Phone, Safari, Shortcuts, and more. Developer beta available now ahead of public beta in July.
Biggest design overhaul since iOS 7 with Liquid Glass, plus new Apple Intelligence features and improvements to Messages, Phone, Safari, Shortcuts, and more. Developer beta available now ahead of public beta in July.


 Note: MacRumors is an affiliate partner with some of these vendors. When you click a link and make a purchase, we may receive a small payment, which helps us keep the site running.