Popular WiFi-connected SD card manufacturer Eyefi recently released a brand new product, the Eyefi Mobi Pro. For those unfamiliar with Eyefi, the company makes WiFi-connected SD cards to give people a way to quickly transfer photos from their cameras to their Macs, iPhones, and iPads, even when a WiFi network is unavailable.
The company's newest card, the Eyefi Mobi Pro offers 32GB of storage, support for RAW file transfers, and a wireless transfer feature that lets users selectively choose which photos to upload. When used on a home WiFi network, the Mobi Pro lets users transfer images at high speeds, but when away from home, it creates its own WiFi hotspot, so it's always possible to get pictures from the SD card to an iPad, iPhone, or Mac.
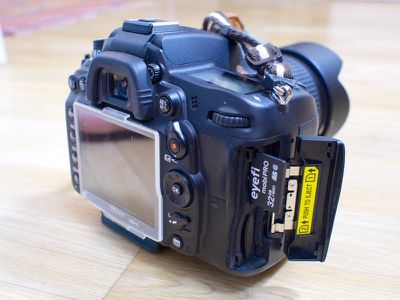
MacRumors went hands-on with the new Eyefi Mobi Pro SD card to check out all of the new features and to figure out whether or not it's worth the $99 price tag.
What's in the Box
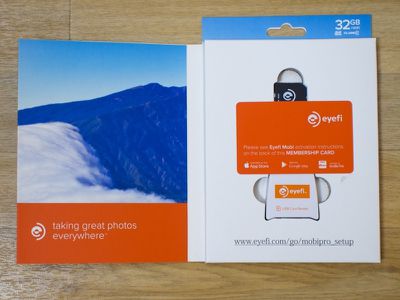
The Eyefi box contains one 32GB Class 10 SDHC WiFi card, a USB card adapter that's used to configure the Mobi card, and an activation card that lets the Mobi Pro pair with desktop and iOS apps. The card also allows users to sign up for a free year of access to Eyefi's cloud service, which allows unlimited photo uploads and storage.
Setup
The Eyefi box directs users straight to a setup website, which makes finding the setup steps easy. The website has instructions for setting the Mobi Pro up to connect to a mobile device or a computer.
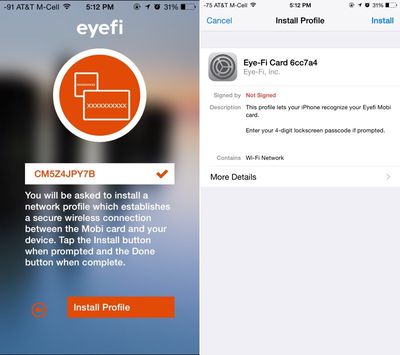
Connecting the Mobi Pro to a mobile device first requires a download of the accompanying Eyefi app. On iOS, the app is called Eyefi Mobi and is available for free in the App Store. Once installed, the app asks for an activation code, which is included in the box, and it will ask you to install a provisioning profile to allow the iPhone to recognize the Mobi Pro card.
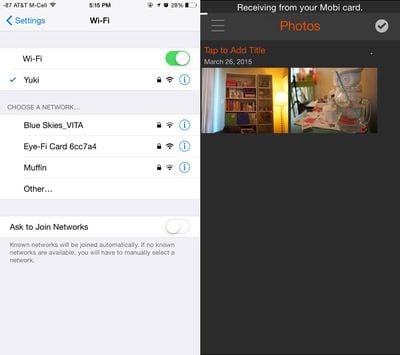
From there, you need to put the SD card in the camera, snap a few pictures, and leave the camera on while you go to the Settings app on your iPhone. Navigate to WiFi and choose the Mobi Pro card network. You'll need to enter the activation code as a password, but the app doesn't specify that, which makes setup a bit more difficult than it needs to be.
Connecting the Mobi Pro card to a Mac is a similar process, and involves downloading the Eyefi Mobi Desktop app then following many of the same activation steps. On the Mac, you don't get a full app -- just a mini app accessible from the menu bar. Plugging the Eyefi card into a Mac with the included USB adapter will bring up some advanced setup settings, letting you add a home network to make uploading photos at home easier.
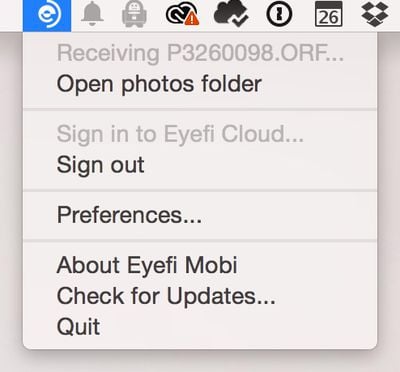
Both the iOS and Mac apps will prompt you to connect the Mobi Pro card to an Eyefi Cloud account. You get a free year of Eyefi Cloud service with the purchase of a Mobi Pro card, and it's $49.99 per year afterwards. It's not a bad deal because you get unlimited storage and it supports both RAW and JPEG files.
Eyefi Cloud is not required to use the Mobi Pro card, but it's useful because it syncs photos across all devices and makes them available through the Eyefi Cloud website.
Setting up the Mobi Pro isn't exactly hard, but it's not entirely straightforward. Documentation is not as clear as it could be, and there were some quirks we found confusing. For example, connecting to the Mobi Pro's WiFi required a password that turned out to be the activation code, but that information wasn't listed anywhere. As another example, when we downloaded the Mac app from the Eyefi site, it downloaded an older version of the software that did not auto update.
How it Works
Once set up, the Mobi Pro card is simple to use. When away from home, the card will create its own WiFi network, so photos (or videos) can be uploaded to an iPhone, iPad, or Mac even when WiFi is not available. Connecting to the card's WiFi is done through the Mac's WiFi bar or the iPhone's settings menu, just like any other WiFi network. When connected, all photos you've taken will be transferred to the device you're connected to (one connection is supported at a time).
If you're away from WiFi and upload your photos to your iPhone using a direct connection, you can go on to upload those photos to the Eyefi Cloud over cellular if your data plan allows for it, making them accessible anywhere right away.
In the advanced settings menu, accessible by plugging the Mobi Pro into a computer, you can also set it up to work with a home WiFi network by adding your network's name and password. With your home WiFi network added to the card, it will use your home WiFi to automatically upload photos to the Eyefi Mac app without the need to connect your Mac directly to the card.
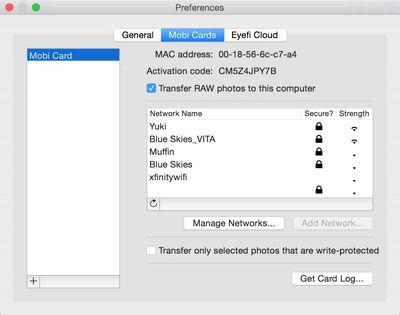
Once you get home from a photo shooting session, just open the Mac app and turn your camera on to get all of the photos that you shot from the Mobi Pro to the Mac. If you've also signed into Eyefi Cloud, photos will upload to the cloud, which also makes them accessible through the iPhone app. If you're shooting at home, photos will transfer to the computer automatically for easy editing as long as the Mac app is open.
So basically, you've got multiple ways to get your photos to every device quickly depending on how you want to use the Mobi Pro card. If you do a direct connection to the iPhone app and enable cloud syncing over cellular, photos will be transferred to the iPhone, uploaded to the Eyefi Cloud and accessible on a Mac via a browser. If you wait until you get home, you can transfer the photos to your Mac, where they'll also be uploaded to Eyefi Cloud and available on the iPhone.
Whenever you're uploading photos from your camera to an iOS device or Mac, the SD card slot on the camera needs to be activated. On most cameras, power is set to shut off after approximately 30 seconds to preserve battery, so this will need to be extended in the camera settings menu to make sure the card stays on. Leaving the camera on to transfer photos can drain the battery faster.
This isn't much of a problem with JPEGs because the file size is relatively small and it takes just seconds to transfer them, but it can be an issue when uploading larger RAW files because those take a bit longer. It's wise to keep an extra battery on hand if you're planning to use the Mobi Pro to upload a lot of files when away from home.
Features
Speed wise, the Mobi Pro is a class 10 SDHC card, so it supports read speeds of 13MB/s and write speeds up to 23/MB/s. That means it can record full 1080p video or consecutive high-quality still photos. When shooting RAW, we had no issues taking multiple burst photos, and there were no issues recording 1080p video.
Physically, the card is similar to a standard SD card, and it should be noted that it is more durable than previous-generation Eyefi cards that were prone to breakage. As with most SD cards, there's a physical write protect switch on the side.
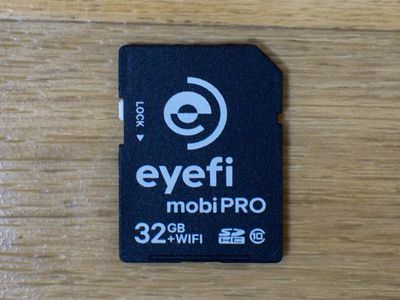
Eyefi's Mobi Pro card supports several image and video formats, including RAW. RAW files will be uploaded to the Mac automatically, but when you try to transfer RAW files to the iPhone app, they'll be converted into JPEGs. The full RAW files will then need to be transferred to the Mac later, but they can also be uploaded to the cloud via the iPhone if you're signed into the Eyefi Cloud service.
One of the new features unique to the Mobi Pro is selective transfer, which lets you choose the photos that you want to sync to your devices. With previous Eyefi cards, uploading photos was an all or nothing deal, but that's not the case with the new card. To use selective transfer, you need to enable it using your Mac and then choose photos to keep using the "protect" feature in your camera's settings. You need to individually flag each photo with the protect option, which isn't the most elegant solution, but it's nice to have the option if you only want to sync a handful of photos.
The Mobi Pro, like all of the Eyefi SD cards, is compatible with a wide range of cameras. Companies like Olympus, Nikon, and Canon even have Eyefi support built-in to their cameras. You can check whether your camera is compatible using Eyefi's site.
Eyefi Apps
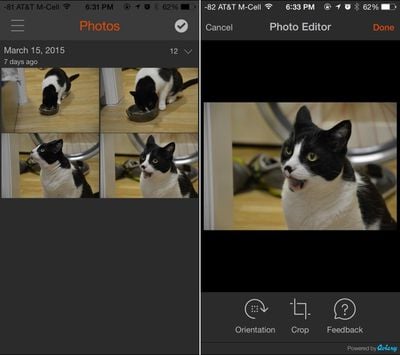
The Eyefi Mac app is basically just used to facilitate photo transfers and to adjust the Mobi Pro's settings, but the Eyefi Mobi iOS app has a few more features. Unlike the Mac app, it will display all of the photos that you've uploaded from your Mobi Pro card, and if you're signed into the Eyefi Cloud, it'll display all of your cloud photos too.
There are some basic editing tools for cropping and straightening photos built in, plus it organizes all of your photos into albums by date. It also supports tags, includes EXIF info, and lets you delete info. Settings within the app give you the option to send photos you've uploaded to the camera roll, and there's also a setting to import photos you've taken on your iPhone, giving you a way to get all of your photos, taken on camera or iOS device, into the Eyefi Cloud if you're using that.
Customer Service
During our testing of the Mobi Pro, we ran into a major bug that caused the card to be nearly unusable and unable to connect to a home WiFi network. It wasn't being recognized by the Mac app because as it turns out, our card was never activated properly. This was an error that came up during the activation process, and it turned out to be an error the Eyefi team said it hadn't seen before.
We had a conversation with an Eyefi product manager who, with the help of engineers, talked us through reactivating the Mobi Pro card and then pushed a fix so it wouldn't happen again to other users. As we had a review unit, we obviously got straight to the top of the customer service ladder, but we were impressed with the company's support database and its willingness to spend several hours on a Friday night fixing an obscure bug.
Who's it For?
The Eyefi Mobi Pro is a card that's suitable for DSLR users who want a way to automatically transfer RAW and JPEG files to their computers or mobile devices. On average, a 32GB class 10 SD card can be purchased for under $20, so at $99 for the Eyefi Mobi Pro, you're paying quite a premium for convenience.
Is that extra money worth it? It depends on your workflow. If you want a way to quickly get photos from your camera to your iPhone, the Mobi Pro is a good solution. If you need a way to get photos to your Mac or iOS device even when you don't have Internet, the Mobi Pro does that. If you don't want to hassle with removing the SD card from your camera and plugging it into your Mac after a long day of shooting, the Mobi Pro will upload them automatically, and for some, the time saved will make the Mobi Pro worth the money.
For computers that don't have SD card slots, like Apple's upcoming MacBook, the Mobi Pro will be especially useful, especially during the early months when no SD card adapters exist.
Many DSLRs and mirrorless cameras these days come with built-in WiFi. If you already have a WiFi-enabled camera, the Mobi Pro may make less sense, but many WiFi cameras are somewhat more limited. For example, with Olympus' line of mirrorless cameras, you can upload to iOS via an app, but there are no options for automatically syncing all photos to the desktop.
If you're going to get a Mobi Pro SD card, keep in mind that it works best with the Eyefi Cloud service. With Eyefi Cloud, all of your photos are available on all of your devices almost instantaneously for quick sharing and editing, and that's a benefit that can't be overlooked. You get a free year with purchase, but you're probably going to want to keep using it after storing a year's worth of photos, so take into account the $49.99/year charge.
Pros
- Uploads photos automatically at home
- Uploads photos via direct connect when no WiFi is available
- Convenient
- Supports RAW and JPEG files
- Eyefi Cloud makes photos available everywhere
Cons
- Setup is a bit confusing
- Expensive
- Some battery drain
- Selective transfer is time consuming
How to Buy
Eyefi's new Mobi Pro 32GB WiFi SD card can be purchased from the Eyefi website for $99.99. That price includes a complimentary year of the company's Eyefi Cloud service, with unlimited syncing and storage.













Top Rated Comments
Why?
The Eyefi app. At the end of the day she traded one step for another step and didn't really save much time or effort. The transfer speeds of her (early) card were not all that fast, and then once in the Eyefi app she had to export all her images into iPhoto or Photoshop or whatever program she used to edit them. When she just used a card reader the transfer rates were much faster and she could import the photos directly into an app with useful editing tools.
Sounds like not a whole lot has changed, which is unfortunate. The iPhone is one of the most used camera's because all your photos go to the same place. I wish there was a way to use the Eyefi to directly import into iPhoto/Photos. That would make me buy one.
On that note, does anyone know of a wifi card/adapter/camera that will wirelessly transfer directly into iPhoto/Photos? Nikon has wifi adapters now, but I believe they only "talk" with the Nikon app too.
It's a good idea but it is poorly implemented. They would be smarter to create a virtual USB device for Windows and Mac so that when you connect to the EyeFi it appears on your computer like a USB storage device. The same way a real camera plugged in over USB would. That would allow direct importing into Aperture, iPhoto or the new Photos app without faffing around in their app first.
It can be done as I have iKVM devices for server IPMI's (remote access tools for servers) which can create virtual USB devices locally for what is plugged in to the server over the internet.
This is possible in ShutterSnitch. When I travel, I create sets by day/location and then you can rate the photos, etc. You can move photos between sets, you can send over BT photos from the iPhone app to the iPad app...so many features, really.
I just want to be clear that I don't have any stake in ShutterSnitch, it's just really a great app for photographers and want to spread the word to support the very hard working Dev.
Personally, I just bring my cards home and stick them in my iMac.
However my new camera arriving in a few days, will have built in WIFI, so I'll explore a few other options then.