Regularly creating iCloud or iTunes backups should be routine for every iOS user, but if you want to upgrade to a beta version of iOS or if you think you might want to downgrade shortly after installing a new iOS update, you'll want to make sure create an archived iTunes backup beforehand.
An archived iTunes backup is essential because it saves the current state of your iOS device and prevents it from being accidentally overwritten by subsequent backups. Apple recommends all public beta testers create an archived backup before installing a beta in case something goes wrong and a restore is needed. Here's how to do it.
Create an Encrypted Backup

- Connect your iPhone or iPad to a Mac with the latest version of iTunes installed and click on the device icon in iTunes.
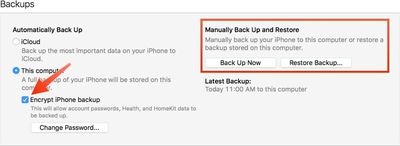
- Under backups, choose "This computer." Select "Encrypt iPhone backup" and set a password. An encrypted backup includes account passwords, Health, and HomeKit data. A non-encrypted backup will wipe all of this data if it's used for a restore.
- Click "Back Up Now" and wait for the backup process to finish. It will take approximately five minutes to complete depending on what's installed on your iPhone.
Archive the Backup

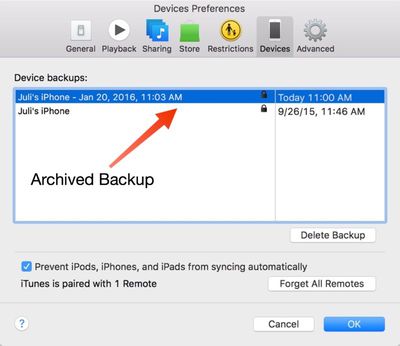
- To archive the backup, choose "Preferences" from the iTunes menu and select the "Devices" tab. Choose the fresh backup and right click to bring up the "Archive" option.
- Once archived, a backup will be marked with the date and the exact time that it was archived.
Your archived backups are always visible in the Preferences section of iTunes, even when a device is not plugged in. Deleting one of your archived backups can be done from the same menu, by selecting a backup and choosing the "Delete Backup" option.
This guide is applicable to iTunes users on the Mac. Windows iTunes users are not able to create archived iTunes backups using the same method and will instead need to rename their iTunes backup folder or move it to another location to prevent it from being overwritten.
Creating an archived backup is one of the key steps in our how to that walks users through installing a beta version of iOS, which is available here.


Top Rated Comments
It'll be useful to people who aren't familiar with creating archived backups and it's specifically being added for future use in other how tos where an archived backup is a requirement, like this one: https://www.macrumors.com/how-to/how-to-download-ios-beta/
You'll see a few other how tos like this here and there with the same disclaimer.
Find and Manage your iTunes backups
https://support.apple.com/en-us/HT204215
The backups in the default directory will be named the UDID of the device that created them. Simply drag the folder to an external drive or wherever you back up your files, and when it's time to restore, move them back into the default directory and it will be available in iTunes to restore from.
Could you please also give us more complete instructions on how to archive a backup on a PC? For example, the location of the backup folder and/or how to rename it (e.g. do you just rename the folder or change a setting in iTunes)?
I'm not entirely sure that archived backups aren't possible on a PC. I have an archived backup on my PC together with a date and time, and some non archived backups. Perhaps this happens automatically if you restore your device to an earlier state then back up (e.g. if you back up a new iPhone, then restore it from an older iPhone, does the new iPhone backup gets archived).